No edit summary Tag: sourceedit |
No edit summary |
||
| Line 15: | Line 15: | ||
|NondefensiveBuildings=8 |
|NondefensiveBuildings=8 |
||
|RecommendedArmy=[[Heavy]]-[[Zooka]] |
|RecommendedArmy=[[Heavy]]-[[Zooka]] |
||
| − | |Walkthrough=Use [[Artillery]] and [[Barrage]] to destroy the [[Boom Cannon]] and the [[Rocket Launcher]]. Deploy your [[:Category:Troops|Troops]] on the topmost part of the left beach, and allow them to attack the [[Flamethrower]] and [[Machine Gun]]. They |
+ | |Walkthrough=Use [[Artillery]] and [[Barrage]] to destroy the [[Boom Cannon]] and the [[Rocket Launcher]]. Deploy your [[:Category:Troops|Troops]] on the topmost part of the left beach, and allow them to attack the [[Flamethrower]] and [[Machine Gun]]. They should not have too much trouble taking the [[Machine Gun]]s down, but use [[Shock Bomb]]s if needed. When the middle [[Sniper Tower]] is destroyed, [[Flare]] your [[:Category:Troops|troops]] up to the top of the base so they can either finish off the two upper [[Sniper Tower]]s if they haven't already, or destroy the [[Headquarters]]. You may want to use another [[Shock Bomb]] to stop remaining [[:Category:Defensive Buildings|Defenses]] picking off your [[Zooka]]s. |
| − | |RecommendedArmy2= |
+ | |RecommendedArmy2=[[Tank]]s |
| − | |Walkthrough2=Destroy the [[Boom Cannon]] with [[Barrage]] and [[Artillery]]. Dock your troops on the left hand side and support them with [[Medkit]] and [[Shock Bomb]]. If a [[Cannon]] can hit any of your troops, drop a [[Flare]] on the [[Rocket Launcher]] then let the troops destroy the [[Headquarters]]. |
+ | |Walkthrough2=Destroy the [[Boom Cannon]] with [[Barrage]] and [[Artillery]]. Dock your [[troops]] on the left hand side and support them with [[Medkit]] and [[Shock Bomb]]. If a [[Cannon]] can hit any of your [[troops]], drop a [[Flare]] on the [[Rocket Launcher]] then let the [[troops]] destroy the [[Headquarters]]. |
|RecommendedArmy3= |
|RecommendedArmy3= |
||
|Walkthrough3= |
|Walkthrough3= |
||
Latest revision as of 13:32, 14 December 2018
Blackguard's Finest
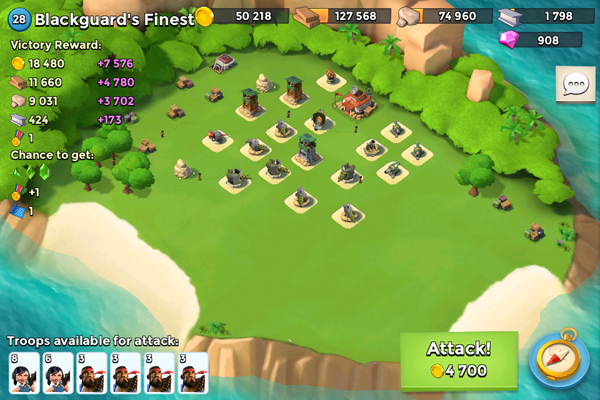
Buildings
- Headquarters
- 3 Sniper Towers
- 7 Machine Guns
- 1 Mortar
- 3 Cannons
- 1 Flamethrower
- 1 Boom Cannon
- 1 Rocket Launcher
- 8 Non-defensive Buildings
Base Statistics
- Total Buildings: 26
- Total Energy Available from Buildings: 75
- Total Energy Available from Non-defensive Buildings: 24
- Destroying a building will reduce the HQ's health by 2.8%
Strategy
Recommended Army Composition: Heavy-Zooka
Walkthrough: Use Artillery and Barrage to destroy the Boom Cannon and the Rocket Launcher. Deploy your Troops on the topmost part of the left beach, and allow them to attack the Flamethrower and Machine Gun. They should not have too much trouble taking the Machine Guns down, but use Shock Bombs if needed. When the middle Sniper Tower is destroyed, Flare your troops up to the top of the base so they can either finish off the two upper Sniper Towers if they haven't already, or destroy the Headquarters. You may want to use another Shock Bomb to stop remaining Defenses picking off your Zookas.
Alternate Strategy
Recommended Army Composition: Tanks
Walkthrough: Destroy the Boom Cannon with Barrage and Artillery. Dock your troops on the left hand side and support them with Medkit and Shock Bomb. If a Cannon can hit any of your troops, drop a Flare on the Rocket Launcher then let the troops destroy the Headquarters.