m (New strategy) Tag: Visual edit |
No edit summary |
||
| Line 10: | Line 10: | ||
|Walkthrough2=Use a [[Barrage]] on the cluster of [[Mine]]s on the far left. If you have enough [[Gunboat]] energy, use [[Artillery]] and [[Barrage]] to destroy the topmost [[Cannon]], but this is not necessary. Deploy your [[Grenadier]]s & [[Medic]]s on the far left of the left beach and [[Flare]] them to behind the leftmost Tree, so they are out of range of the leftmost [[Cannon]]. If damaged by the [[Mine]]s, the [[Medic]]s will heal your [[:Category:Troops|Troops]]. The [[Grenadier]]s will be out of range of the [[Cannon]]s and destroy them without taking damage, then will target the [[Headquarters]]. |
|Walkthrough2=Use a [[Barrage]] on the cluster of [[Mine]]s on the far left. If you have enough [[Gunboat]] energy, use [[Artillery]] and [[Barrage]] to destroy the topmost [[Cannon]], but this is not necessary. Deploy your [[Grenadier]]s & [[Medic]]s on the far left of the left beach and [[Flare]] them to behind the leftmost Tree, so they are out of range of the leftmost [[Cannon]]. If damaged by the [[Mine]]s, the [[Medic]]s will heal your [[:Category:Troops|Troops]]. The [[Grenadier]]s will be out of range of the [[Cannon]]s and destroy them without taking damage, then will target the [[Headquarters]]. |
||
Optionally, you can deploy a [[Tank]] or [[Tank]]s before deploying [[Grenadier]]s and [[Medic]]s in order to destroy the leftmost [[Mine]]s. The [[Tank]]s will NOT be out of range of [[Cannon]]s and can be destroyed, so minimize the amount of [[Tank]]s you deploy if you choose this strategy. |
Optionally, you can deploy a [[Tank]] or [[Tank]]s before deploying [[Grenadier]]s and [[Medic]]s in order to destroy the leftmost [[Mine]]s. The [[Tank]]s will NOT be out of range of [[Cannon]]s and can be destroyed, so minimize the amount of [[Tank]]s you deploy if you choose this strategy. |
||
| + | RecommendedArmy3 = [[Tank]]s |
||
| − | |Walkthrough3 = Begin by using [[Barrage]] and [[Artillery]] to take out the bottom-middle [[Cannon]]. Then, deploy all troops on the left-ish area of the beach, and [[ |
+ | |Walkthrough3 = Begin by using [[Barrage]] and [[Artillery]] to take out the bottom-middle [[Cannon]]. Then, deploy all [[troops]] on the left-ish area of the beach, and [[Shock Bomb|shock]] the bottom-left [[Cannon]] while they destroy it. If positioned correctly, they should destroy the [[Headquarters]] without coming into range of any more of the [[Cannon]]s. If not, [[Flare]] them so that they are not.| |
| + | }} |
||
Revision as of 11:59, 24 April 2019
Cannonball
Buildings
Base Statistics
- Total Buildings: 7
- Total Energy Available from Buildings: 18
- Total Energy Available from Non-defensive Buildings: 0
- Destroying a building will reduce the HQ's health by 11.667%
Strategy
Recommended Army Composition: Riflemen or Rifle-Medic
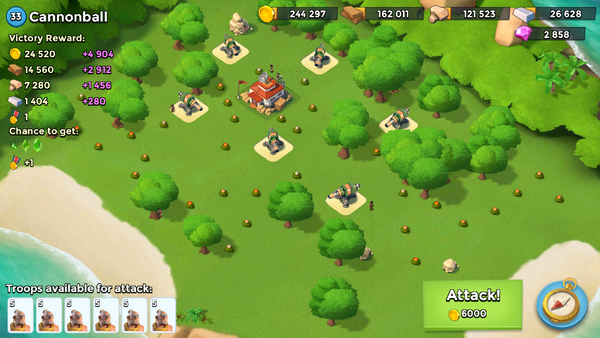
Walkthrough: Use a Barrage on the middle of the set of Mines on the left side of the base. Deploy your Troops on the topmost part of the left beach and Flare them to the leftmost Cannon. Use Shock Bombs on the two leftmost Cannons while you destroy them. If damaged by the Mines, the Medics will heal your Troops. If you don't have any Medics, consider using some Medkits to heal your Riflemen throughout the battle. Use Artillery to trigger the two topmost Mines. When the three Cannons to the left of the Headquarters are destroyed, Flare your Troops to the top of the Headquarters and destroy it.
Alternate Strategy
Recommended Army Composition: Grenadiers & Medics OR Tanks, Grenadiers & Medics (GrAnk-Med)
Walkthrough: Use a Barrage on the cluster of Mines on the far left. If you have enough Gunboat energy, use Artillery and Barrage to destroy the topmost Cannon, but this is not necessary. Deploy your Grenadiers & Medics on the far left of the left beach and Flare them to behind the leftmost Tree, so they are out of range of the leftmost Cannon. If damaged by the Mines, the Medics will heal your Troops. The Grenadiers will be out of range of the Cannons and destroy them without taking damage, then will target the Headquarters. Optionally, you can deploy a Tank or Tanks before deploying Grenadiers and Medics in order to destroy the leftmost Mines. The Tanks will NOT be out of range of Cannons and can be destroyed, so minimize the amount of Tanks you deploy if you choose this strategy. RecommendedArmy3 = Tanks
Second Alternate Strategy
Recommended Army Composition: Not Specified
Walkthrough: Begin by using Barrage and Artillery to take out the bottom-middle Cannon. Then, deploy all troops on the left-ish area of the beach, and shock the bottom-left Cannon while they destroy it. If positioned correctly, they should destroy the Headquarters without coming into range of any more of the Cannons. If not, Flare them so that they are not.