m (Protected "Base:Dark Tide" ([move=sysop] (indefinite))) |
No edit summary |
||
| Line 11: | Line 11: | ||
|NondefensiveBuildings=6 |
|NondefensiveBuildings=6 |
||
|RecommendedArmy=[[Rifleman|Rifle]]-[[Zooka]] |
|RecommendedArmy=[[Rifleman|Rifle]]-[[Zooka]] |
||
| − | |Walkthrough=Damage or destroy both [[Rocket Launcher]]s with [[Artillery]]/[[Barrage]]. Deploy your [[:Category:Troops|Troops]] on the right beach, where the [[Obstacles|Trees]] and [[Supply Buildings|Supplies]] lie. If both [[Rocket Launcher]]s were not destroyed, [[Shock Bomb|Shock]] them and destroy them with [[Artillery]] as soon as possible. Have your [[:Category:Troops|Troops]] destroy the [[Supply Buildings|Supplies]] first. As they approach the [[:Category:Defensive Buildings|Defenses]], [[Shock Bomb|Shock]] the right [[Flamethrower]] along with the |
+ | |Walkthrough=Damage or destroy both [[Rocket Launcher]]s with [[Artillery]]/[[Barrage]]. Deploy your [[:Category:Troops|Troops]] on the right beach, where the [[Obstacles|Trees]] and [[Supply Buildings|Supplies]] lie. If both [[Rocket Launcher]]s were not destroyed, [[Shock Bomb|Shock]] them and destroy them with [[Artillery]] as soon as possible. Have your [[:Category:Troops|Troops]] destroy the [[Supply Buildings|Supplies]] first. As they approach the [[:Category:Defensive Buildings|Defenses]], [[Shock Bomb|Shock]] the right [[Flamethrower]] along with the nearest [[Sniper Tower]], and as many other [[:Category:Defensive Buildings|Defenses]] as possible. If the [[Shock Bomb]] wears off before the [[Flamethrower]] is destroyed, use another [[Shock Bomb]] or place a [[Medkit]] to heal your [[Riflemen]]. Once the [[Flamethrower]] goes down, have your [[:Category:Troops|Troops]] attack the [[:Category:Defensive Buildings|Defenses]] from the southeast. The massed infantry should be able to overwhelm the single-target [[:Category:Defensive Buildings|Defenses]] located in the northeast part of the base. Re-[[Flare]] your [[:Category:Troops|Troops]] if they stray off too far from the north-east route to the [[Headquarters]]. |
}} |
}} |
||
Revision as of 16:58, 5 July 2019
Dark Tide
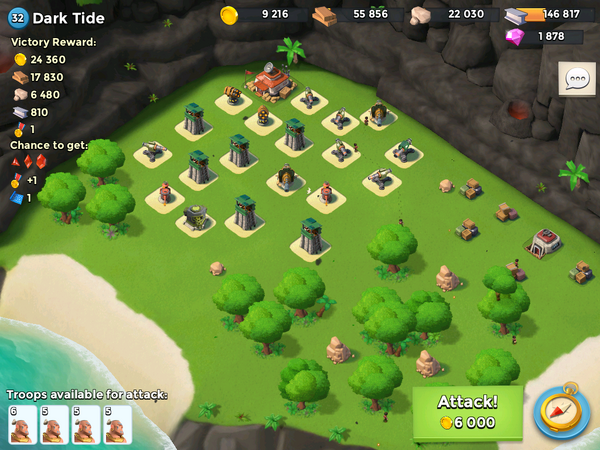
Buildings
- Headquarters
- 6 Sniper Towers
- 1 Machine Gun
- 6 Cannons
- 2 Flamethrowers
- 2 Boom Cannons
- 2 Rocket Launchers
- 6 Non-defensive Buildings
Base Statistics
- Total Buildings: 26
- Total Energy Available from Buildings: 75
- Total Energy Available from Non-defensive Buildings: 18
- Destroying a building will reduce the HQ's health by 2.8%
Strategy
Recommended Army Composition: Rifle-Zooka
Walkthrough: Damage or destroy both Rocket Launchers with Artillery/Barrage. Deploy your Troops on the right beach, where the Trees and Supplies lie. If both Rocket Launchers were not destroyed, Shock them and destroy them with Artillery as soon as possible. Have your Troops destroy the Supplies first. As they approach the Defenses, Shock the right Flamethrower along with the nearest Sniper Tower, and as many other Defenses as possible. If the Shock Bomb wears off before the Flamethrower is destroyed, use another Shock Bomb or place a Medkit to heal your Riflemen. Once the Flamethrower goes down, have your Troops attack the Defenses from the southeast. The massed infantry should be able to overwhelm the single-target Defenses located in the northeast part of the base. Re-Flare your Troops if they stray off too far from the north-east route to the Headquarters.