m (→C: add level "Calamari") Tag: sourceedit |
(added strat) Tag: sourceedit |
||
| Line 48: | Line 48: | ||
|boommines=5 |
|boommines=5 |
||
|nondefensivebuildings=4 |
|nondefensivebuildings=4 |
||
| − | |recommendedcomposition= |
+ | |recommendedcomposition=[[Tank]]-[[Medic]] |
| + | |walkthrough=Destroy the [[Boom Cannon]] and as many shore [[Cannon]]s as you can with [[Barrage]] and [[Artillery]] while still keeping enough [[Gunboat|GBE]] to land your Tanks. Once that's done, land your troops on the right side of the beach. [[Shock Bomb|shock]] the [[Shock Launcher]] to keep it from slowing your attack. Your troops should reach the [[HQ]] with little trouble. |
||
| − | |walkthrough= |
||
}} |
}} |
||
Revision as of 14:41, 3 July 2015
A

B
C
D
E
F
G
H
I
J
K
L
M
N
O
P
Q
R
S
T
U
V
W
X
Y
Z
C
| Caged | |
 | |
|
Buildings:
|
Total Number of Buildings: 16 |
| Strategy
Recommended Army Composition: Heavy-Zooka or Rifle-Zooka Walkthrough: Barrage the Rocket Launcher and Boom Cannon, finishing them off with Artillery if necessary. Deploy all your Troops on the right beach. They should be able to sweep up without too much difficulty. Take out the Cannon nearest the HQ with Artillery as soon as you can, and once the Machine Gun is gone, Flare your Troops to the right hand side of the HQ, where they can finish off the HQ out of range of any remaining Defenses. | |
| Alternate Strategy
Recommended Army Composition: Heavy-Zooka or Rifle-Zooka Walkthrough: Again, Barrage the Rocket Launcher and Boom Cannon, finishing off with Artillery if necessary. Deploy all your Troops on the left beach instead, and as they approach the Sniper Tower, use a Shock Bomb to disable the Sniper Tower, Cannon and Flamethrower. Once the stated Defenses have been destroyed, Flare your Troops to the north of the HQ where, once again, they can finish off the HQ out of range of any remaining Defenses.
| |
| Cake Walk | |
 | |
|
Buildings:
|
Total Number of Buildings: 25 |
| Strategy
Recommended Army Composition: Warriors Walkthrough: Deploy your Warriors on the left beach so they target the row of Supplies along the left-hand side. When they are in range of the Boom Cannon at the top, place a Shock Bomb between the Boom Cannon, Rocket Launcher, and Cannon. Shock the Boom Cannon just below the Headquarters once the Warriors approach the Headquarters and come within range of it. | |
| Alternate Strategy
Recommended Army Composition: Tanks and Medics Walkthrough: Destroy the top Boom Cannon and Cannon using Barrage and Artillery. Deploy your Troops on the left side of the left beach. Let them destroy the Supply Buildings. Use Flares to avoid the Boom Mines. When the Supplies are down, Flare your Troops next to the Rocket Launcher (but not on it). The Rocket Launcher and Mortars should be taken out easily. It would be best to destroy the nearby Sniper Tower. When that is done, Flare your Troops back to the upper left of the Headquarters and let them destroy it.
| |
| Calamari | |
 | |
|
Buildings:
|
Total Number of Buildings: 49 |
| Strategy
Recommended Army Composition: Tank-Medic Walkthrough: Destroy the Boom Cannon and as many shore Cannons as you can with Barrage and Artillery while still keeping enough GBE to land your Tanks. Once that's done, land your troops on the right side of the beach. shock the Shock Launcher to keep it from slowing your attack. Your troops should reach the HQ with little trouble.
| |
| Caltrops | |
 | |
|
Buildings:
|
Total Number of Buildings: 20 |
| Strategy
Recommended Army Composition: Walkthrough:
| |
| Camper | |
 | |
|
Buildings:
|
Total Number of Buildings: 19 |
| Strategy
Recommended Army Composition: Riflemen or Heavy-Zooka Walkthrough: Deploy your Troops on the left beach, and let them destroy the five Sniper Towers while under your Gunboat's support. The other Defenses can be simply avoided by flanking up the left side and attacking the HQ from there.
| |
| Can Opener | |
 | |
|
Buildings:
|
Total Number of Buildings: 19 |
| Strategy
Recommended Army Composition: Heavy-Zooka or Heavy-Zooka-Medic Walkthrough: Trigger some Boom Mines using Artillery/Barrage. Deploy your Troops, and when the first Flamethrower is destroyed, Shock the Cannon and 3 Boom Cannons. Let your Troops destroy the Defenses up until the second Cannon. Then Flare your Troops to the Mangrove Grove near the Supplies. Once destroyed, Flare your Troops to the HQ and Shock the Cannons.
| |
| Cannonball | |
 | |
|
Buildings: |
Total Number of Buildings: 7 |
| Strategy
Recommended Army Composition: Riflemen or Rifle-Medic Walkthrough: Use a Barrage on the middle of the set of Mines on the left side of the base. Deploy your Troops on the topmost part of the left beach and Flare them to the leftmost Cannon. Use Shock Bombs on the two leftmost Cannons while you destroy them. If damaged by the Mines, the Medics will heal your Troops. If you don't have any Medics, consider using some Medkits to heal your Riflemen throughout the battle. Use Artillery to trigger the two topmost Mines. When the three Cannons to the left of the HQ are destroyed, Flare your Troops to the top of the HQ and destroy it.
| |
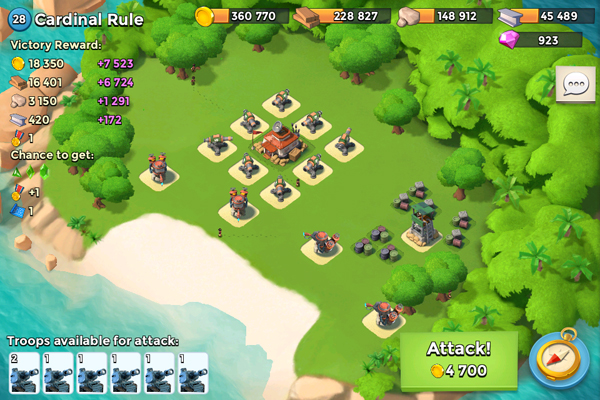
| Cardinal Rule | |
 | |
|
Buildings:
|
Total Number of Buildings: 22 |
| Strategy
Recommended Army Composition: Warriors Walkthrough: This strategy is effective for a low level HQ. Use Artillery/Barrage to destroy the 2 Flamethrowers closest to the HQ. Deploy all your Warriors on top left of the beach. Place a Shock Bomb on the middle of the HQ so that 4 Cannons are Shocked. Flare your Warriors to the HQ. They should be able to destroy the HQ before, or just as, the Shock Bomb runs out. | |
| Alternate Strategy
Recommended Army Composition: Riflemen or All Zookas Walkthrough: This strategy is effective for a high level HQ. Use Artillery/Barrage to destroy the two leftmost Flamethrowers. Deploy your Riflemen or Zookas and let them overwhelm the Cannons. Use Shock Bombs if necessary. When the Cannons are down, attack the HQ.
| |
| Cardinal Rule II | |
 | |
|
Buildings:
|
Total Number of Buildings: 28 |
| Strategy
Recommended Army Composition: Heavy-Zooka Walkthrough: Use Artillery/Barrage to destroy the top right Rocket Launcher. Deploy your Troops on the very bottom left corner of the beach. Immediately Shock the Rocket Launcher, Sniper Towers, and Machine Gun closest to your Troops. Flare your Troops to the middle of the 4 stated Defenses and destroy them. Use Medkits and/or Shock Bombs if necessary. When the four stated Defenses are down, Flare your Troops to the Supplies on the left side of the base. Let them gain some extra Gunboat Energy. When the Sniper Tower starts firing, Flare your Troops to it and destroy it. Use Shock Bombs or Barrage/Artillery the Machine Gun and other Sniper Tower as you take down the HQ.
| |
| Carrot Feeder | |
 | |
|
Buildings:
|
Total Number of Buildings: 50 |
| Strategy
Recommended Army Composition: Warriors Walkthrough: Barrage the HQ to take out the Mines surrounding it. Flare the second from left Flamethrower and deploy your Troops, using Smoke Screens to cover them as they approach the Flamethrower. Flare the middle Shock Launcher, then use a few more Smoke Screens to cover up your Warriors as they move towards the Shock Launcher. Use one last Flare to have your Warriors surround the HQ, using Smoke Screens one last time to cover them up. When the Smoke Screen dissipates, use a Shock Bomb to Shock the two leftmost groups of Boom Cannons and Shock Launchers all at once. Shock the other Shock Launcher, the rightmost Rocket Launcher and the rightmost Boom Cannon with a second Shock Bomb. After that it's the usual race against time to take out the HQ. | |
| Alternate Strategy
Recommended Army Composition: Tank-Medic Walkthrough: Destroy the 2 pairs of Boom Cannons and Shock Launchers on the left side of the island. Then, deploy your Troops on the left beach and let them work their way up the column of Defenses. Shock the Cannons if necessary. As you go up, use Barrage and Artillery to destroy the third Shock Launcher on the right side of the HQ. Then position your Tanks with Flares on the left side of the HQ and wait for them to destroy it.
| |
| Carrot Stick | |
 | |
|
Buildings:
|
Total Number of Buildings: 11 |
| Strategy
Recommended Army Composition: Heavy-Zooka Walkthrough: Destroy as many Cannons as possible with Artillery and Barrage. Deploy your Troops in the middle of the beach and let them destroy the three front Defenses. Then go for the HQ. The Rocket Launcher will not be able to take out your Troops in time.
| |
| Cataclysm | |
 | |
|
Buildings:
|
Total Number of Buildings: 21 |
| Strategy
Recommended Army Composition: Heavy-Zooka Walkthrough: Destroy the Boom Cannon with Artillery/Barrage, then deploy your Troops on the right side of the beach. Let them take out the group of Supplies for extra Gunboat Energy. Attack the Sniper Tower, working your way northwest towards the HQ. As the Troops approach the Mortars, use Medkits to keep your Heavies alive. If done correctly the Rocket Launcher should target your Heavies and not your Zookas throughout the attack, and you should be able to take down the HQ easily.
| |
| Celery Station | |
 | |
|
Buildings:
|
Total Number of Buildings: 17 |
| Strategy
Recommended Army Composition: Warriors Walkthrough: Destroy the top Cannon and the Machine Gun south-west of the HQ. Use Artillery/Barrage to damage or destroy the two Cannon-Mortar 'pairs'. Leave at least 9 Gunboat Energy. Deploy your Warriors on the middle of the beach. Shock the two leftmost Rocket Launchers and Flare the Warriors to any one of the Cannon-Mortar pairs, if necessary. When that is destroyed, destroy the other pair. Next, Flare your Warriors to any one of the Rocket Launchers. Destroy all three. If you wish, let the Warriors destroy the Economy Buildings to get extra Energy to assist them in taking down the HQ.
| |
| Chestnut Grove | |
 | |
|
Buildings:
|
Total Number of Buildings: 11 |
| Strategy
Recommended Army Composition: Heavy-Zooka Walkthrough: Deploy your Troops on the left side of the beach, where the Sniper Towers are located. Let them run through the base, using Shock Bombs and Medkits to support your Troops if necessary.
| |
| Chobham | |
 | |
|
Buildings:
|
Total Number of Buildings: 49 |
| Strategy
Recommended Army Composition: Tanks and Medics Walkthrough: Use two Barrages on the Boom Cannon and left-most Cannon. Finish either off with Artillery if needed. If possible, destroy as many Boom Mines as you can with another Barrage, Artillery, and/or Critters. Deploy your troops on the left side of the beach. They should be able to plow through the remaining defenses. Use Flares, Shock Bombs, and Medkits when necessary. When the left defenses are destroyed, Flare your troops to top left corner of the Headquarters.
| |
| Chock & Awe | |
 | |
|
Buildings:
|
Total Number of Buildings: 51 |
| Strategy
Recommended Army Composition: Tanks and Medics Walkthrough: Destroy as many top Cannons as possible using Barrages and Artillery. Deploy your troops on the right side of the beach. If the Rocket Launchers fire on your Medics, it may be best to use a Smoke Screen. Your Tanks should be able to handle the remaining defenses. Use Shock Bombs and Medkits when necessary. When most defenses are destroyed, Flare right of the Headquarters.
| |
| Clank | |
 | |
|
Buildings:
|
Total Number of Buildings: 17 |
| Strategy
Recommended Army Composition: Tanks and Medics Walkthrough: Destroy both Boom Cannons using Barrages and Artillery. If you can, destroy the Shock Launcher as well. Deploy your troops on the right side of the beach. They should be able to destroy the remaining defenses and then the Headquarters.
| |
| Close Defense | |
 | |
|
Buildings:
|
Total Number of Buildings: 7 |
| Strategy
Recommended Army Composition: Heavy-Rifle Walkthrough: Damage or destroy the Mortar and/or Sniper Tower using Artillery. Deploy all Troops and destroy the remaining Buildings. Use Artillery to aid your Troops in destroying the Headquarters.
| |
| Clumps | |
 | |
|
Buildings:
|
Total Number of Buildings: 9 |
| Strategy
Recommended Army Composition: Riflemen or Riflemen and Zookas Walkthrough: Destroy the Rocket Launcher with Artillery/Barrage. Use Barrages to clear out as many Mines on the right-hand side as you can. Deploy your Riflemen, and let them take out the right-most Cannon. Then Flare them to the Headquarters. The Flamethrowers should be out of range of the Riflemen, and the Cannons that can target them should not be able to destroy all of them in time.
| |
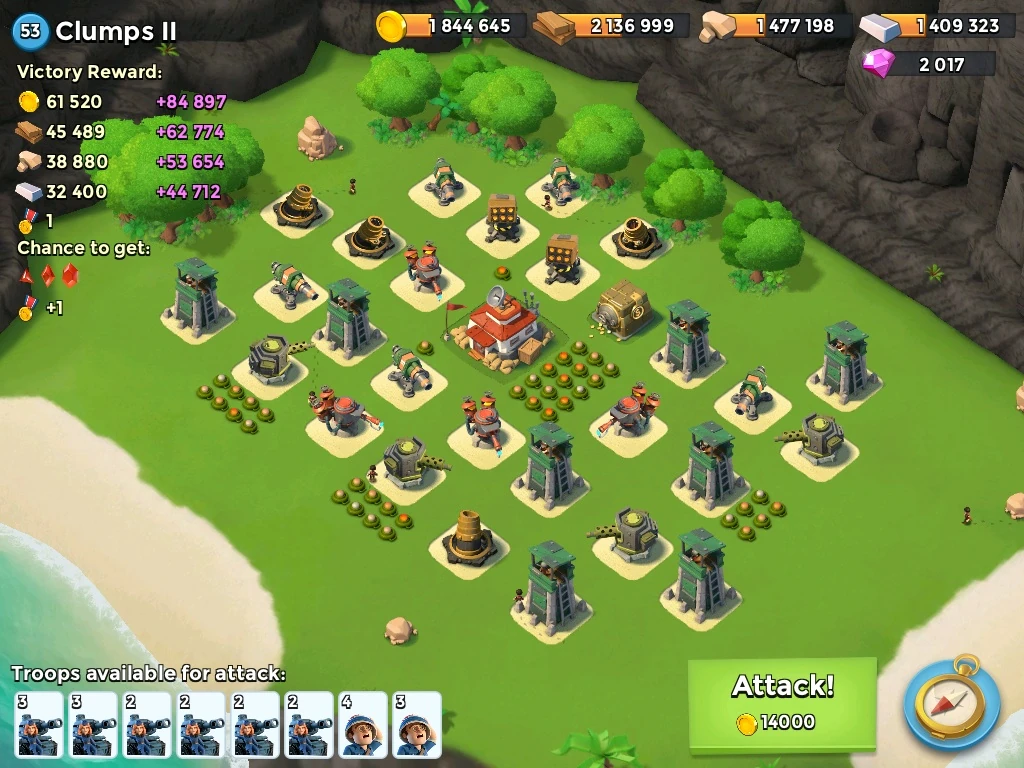
| Clumps II | |
 | |
|
Buildings:
|
Total Number of Buildings: 36 |
| Strategy
Recommended Army Composition: Tanks and Medics Walkthrough: Destroy the two bottommost Cannons, then deploy your Troops on the right beach. Use Shock Bombs and Flares if necessary to destroy the Sniper Towers on the right. After that it should be easy for your Tanks to attack the HQ from the south-east where none of the remaining Cannons can hit them.
| |
| Cluster Bomb | |
 | |
|
Buildings:
|
Total Number of Buildings: 30 |
| Strategy
Recommended Army Composition: Warriors Walkthrough: Deploy your Warriors between the two Supplies just right of the middle. Let them destroy both Supplies. Immediately Flare your Warriors to the far right of the base, and let them destroy all of the Supplies there. Place a Flare between the Headquarters, Sniper Towers, and Cannon, and shoot a Shock Bomb in the same location before your Warriors get there. Let the Warriors destroy the Sniper Towers and Cannon. Then Flare your Warriors to the Headquarters, and Shock the cluster of Sniper Towers left of it.
| |
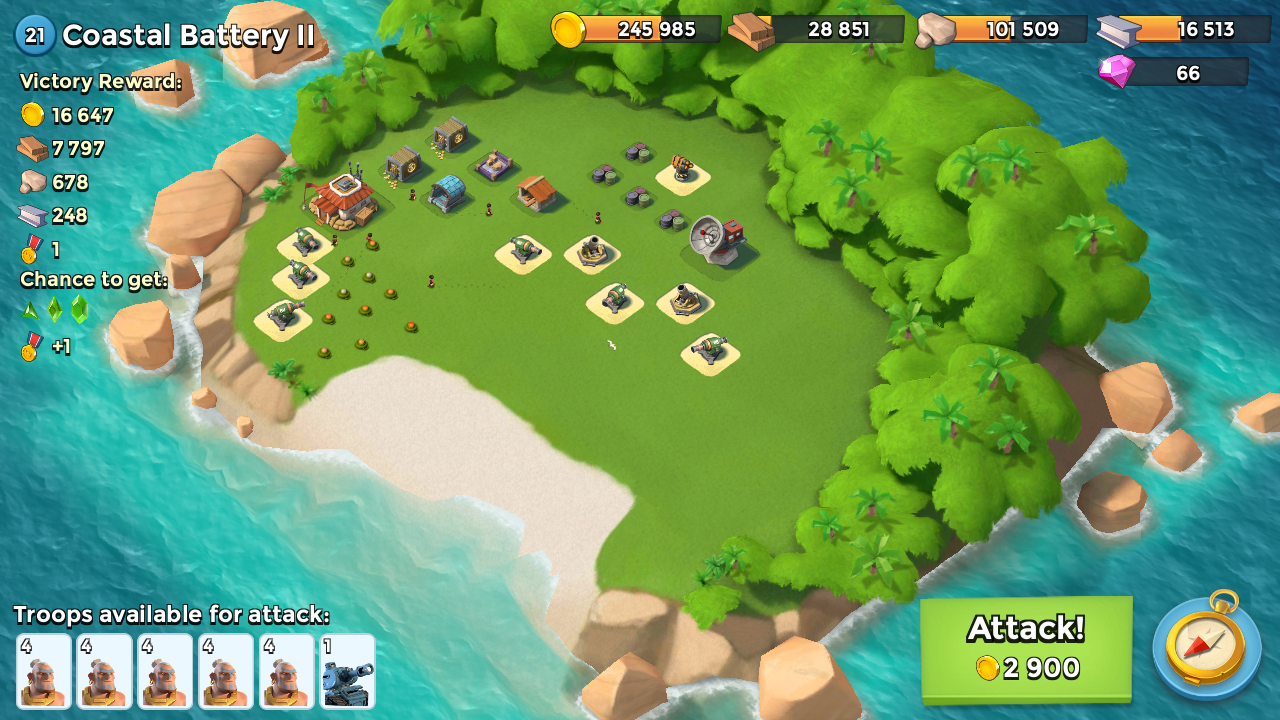
| Coastal Battery II | |
 | |
|
Buildings:
|
Total Number of Buildings: 20 |
| Strategy
Recommended Army Composition: Riflemen Walkthrough: Use Barrage to trigger as many Mines as possible and destroy the Rocket Launcher with Artillery. Deploy your Riflemen on the left side of the beach where the three grouped Cannons are located. Let them overwhelm the Cannons, and attack the HQ from there.
| |
| Cocky | |
 | |
|
Buildings:
|
Total Number of Buildings: 38 |
| Strategy
Recommended Army Composition: Tank-Medic Walkthrough: Destroy the Boom Cannon and the left Cannon with Barrage and Artillery. Deploy your troops and shock the 2 remaining Cannons. Once the Cannons are gone, your Tanks should move through the base with little trouble.
| |
| Combo Breaker | |
 | |
|
Buildings: |
Total Number of Buildings: 4 |
| Strategy
Recommended Army Composition: Warriors Walkthrough: Destroy the Flamethrower with Artillery. Deploy your Warriors and Flare them to the Cannon. Shock it as soon as they are within range of the Cannon. Use any remaining Gunboat Energy for Medkits and Artillery.
| |
| Control Point | |
 | |
|
Buildings:
|
Total Number of Buildings: 24 |
| Strategy
Recommended Army Composition: Heavy-Zooka Walkthrough: Use Artillery to destroy the middle Cannon, and if possible either one of the two that are on the left. Deploy your Troops on the side that has the Cannon you have destroyed, or that will be destroyed, and let them run through the base, Shocking the Cannon if you did not destroy it. Use Flares to direct your Troops away from the other Cannon that can be avoided easily.
| |
| Corner Office | |
 | |
|
Buildings:
|
Total Number of Buildings: 51 |
| Strategy
Recommended Army Composition: Warriors Walkthrough: Clear the Mines around the HQ with Barrage or Artillery. Do the same thing with the Boom Mines. Then, Flare your troops to the Cannon closest to the beach and cover them with Smoke. Flare them to the HQ and shock the defenses around the HQ as they take down the HQ.
| |
| Crafty | |
 | |
|
Buildings:
|
Total Number of Buildings: 7 |
| Strategy
Recommended Army Composition: Warriors Walkthrough: Use Artillery to destroy the Cannon. Deploy all your Warriors on the bottommost point of the beach. Flare them to the Rocket Launcher on the left, and destroy it. Then destroy the other Rocket Launcher. If the Cannon is not destroyed already, Shock the Flamethrowers and destroy it. Then Flare your Warriors to the Mortar on the top-left of the HQ. Wait for Warriors to destroy it, and then go for the HQ.
| |
| Cram | |
 | |
|
Buildings:
|
Total Number of Buildings: 36 |
| Strategy
Recommended Army Composition: Tanks Walkthrough: Note that, as the base name suggests, the Defenses are very close together, so Artillery can hit more than one target at once if used correctly. Use a Barrage on the Rocket Launcher. Then finish it, and the touching Cannon, with Artillery aimed between the two. Destroy the Boom Cannon with Artillery/Barrage. If you have spare Energy, destroy the remaining Cannon to make the battle easier for your Tanks. Deploy them all on the topmost point of the right beach and let them destroy the trio of Mortars and work up towards the HQ. Support them with Artillery/Barrage, and Flare to where the rightmost Mortar was when enough Defenses have been destroyed. They should finish off the HQ with no problem.
| |
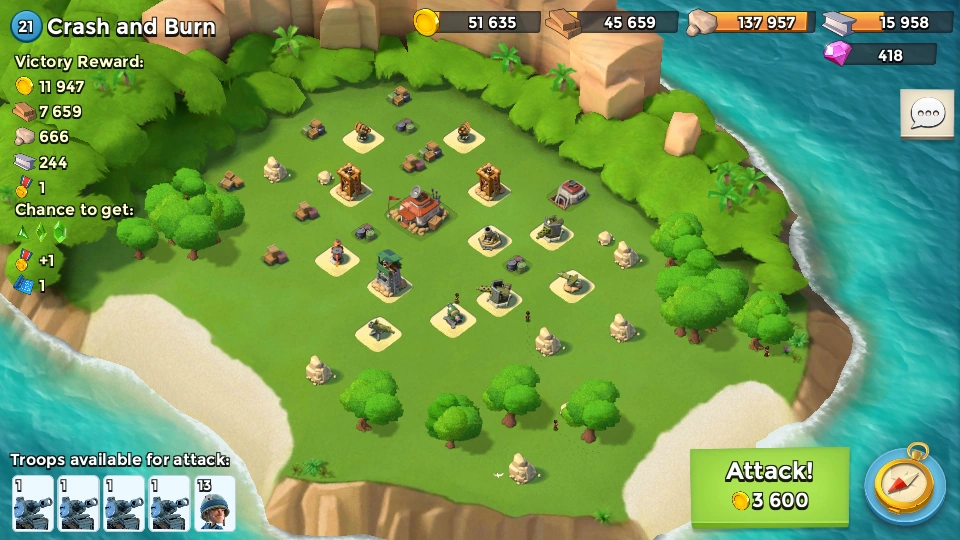
| Crash and Burn | |
 | |
|
Buildings:
|
Total Number of Buildings: 24 |
| Strategy
Recommended Army Composition: Heavy-Zooka Walkthrough: Destroy the bottommost Sniper Tower and the Cannon. Deploy your Troops on the left beach. Make sure that the Heavies are deployed before the Zookas, as to tank any Machine Gun and Rocket Launcher fire. Allow them to run through the base as practically most high-damage Defenses are already destroyed, supporting with a Medkit or Shock Bomb whenever necessary. Do not worry about the Rocket Launchers hitting your Zookas if you have enough Heavies to attack the base; the Heavies will stay in front to tank the Rocket Launcher's damage. Once enough Defenses in front of the HQ are taken down, Flare to the HQ and allow your Troops to finish it off.
| |
| Croatian Sensation | |
 | |
|
Buildings:
|
Total Number of Buildings: 48 |
| Strategy
Recommended Army Composition: Warriors Walkthrough: Deploy your Troops and cover them with Smoke. Flare them to the Rocket Launcher. When they get there, Flare them to the HQ and cover them with Smoke. Shock the Cannons when the Smoke Screen wears off. | |
| Alternate Strategy
Recommended Army Composition: Tanks and Medics Walkthrough: Destroy the front Cannon and Boom Cannon. Deploy your Troops on the left side of the beach. Use a Shock Bomb on the groups of Sniper Towers. Once all of them are down, guide them into the Rocket Launcher's blind spot. Let your Tanks destroy the other Defenses. If necessary, use a Flare to avoid remaining Cannons.
| |
| Crossfire | |
 | |
|
Buildings:
|
Total Number of Buildings: 15 |
| Strategy
Recommended Army Composition: Rifle-Medic Walkthrough: Barrage the Mines around the HQ and in front of the Rocket Launcher. Deploy your Troops near the Rocket Launcher and Shock it as soon as you deploy your Troops. Let the Riflemen enter the Rocket Launcher's blind spot, and destroy it. Once that is done Flare your Troops to the back to avoid the Flamethrowers. From there let your Riflemen overwhelm the four Sniper Towers surrounding the HQ, then Flare them back to the back of the base and proceed to let them attack the HQ. Support your Riflemen with Medkits if they step on the Mines.
| |
| Curveball | |
 | |
|
Buildings:
|
Total Number of Buildings: 8 |
| Strategy
Recommended Army Composition: Heavy-Rifle Walkthrough: Use Artillery to destroy the Machine Gun. The rest of the Defenses can be avoided by deploying your Troops on the topmost point of the beach.
| |
| Cut Above | |
 | |
|
Buildings:
|
Total Number of Buildings: 14 |
| Strategy
Recommended Army Composition: Heavy-Zooka or Heavy-Zooka-Medic Walkthrough: Use Artillery/Barrage to destroy the topmost Cannon. Then use Artillery/Barrage to damage or destroy the two Shock Launchers. If using Artillery, aim in between the Shock Launcher and the Mines to affect them both. Deploy your Troops on the left of the beach. Immediately Shock the two Shock Launchers and Flare your Troops to the left of the base. Let them destroy the two Shock Launchers. Then Flare your Troops up the left side next to the topmost Machine Gun. Destroy the two topmost Machine Guns, and take down the HQ.
| |
| Cutter | |
 | |
|
Buildings:
|
Total Number of Buildings: 20 |
| Strategy
Recommended Army Composition: Warriors Walkthrough: Use Flares and Smoke Screens to get your Warriors to the HQ. Then, Shock the group of Mortars and Machine Guns as your Warriors take down the HQ. | |
| Alternate Strategy
Recommended Army Composition: Grenadiers Walkthrough: Use Artillery and Barrage to destroy the far left Boom Cannon. Deploy your Troops on the far side of the left beach. While they unload on the Machine Guns, they should deal some damage to the center Boom Cannon. Once the front Machine Guns are destroyed, Flare your Troops to the left corner and use some more Artillery or Barrage to finish off the center Boom Cannon. They should eventually destroy the final Boom Cannon whilst attacking the HQ. Once they do, Flare them closer to the HQ to finish it off quicker.
| |
D
| Dark Tide | |
 | |
|
Buildings:
|
Total Number of Buildings: 26 |
| Strategy
Recommended Army Composition: Rifle-Zooka Walkthrough: Damage/destroy both Rocket Launchers with Artillery/Barrage. Deploy your Troops on the right beach, where the Trees and Supplies lie. If both Rocket Launchers were not destroyed, Shock them and destroy them with Artillery as soon as possible. Have your Troops destroy the Supplies first. As they approach the Defenses, Shock the right Flamethrower along with the bottommost Sniper Tower, and as many other Defenses as possible. If the Shock Bomb wears off before the Flamethrower is destroyed, use another Shock Bomb or place a Medkit to heal your Riflemen. Once the Flamethrower goes down, have your Troops attack the Defenses from the southeast. The massed infantry should be able to overwhelm the single-target Defenses located in the northeast part of the base. Re-Flare your Troops if they stray off too far from the north-east route to the HQ.
| |
| Decimated | |
 | |
|
Buildings:
|
Total Number of Buildings: 10 |
| Strategy
Recommended Army Composition: Heavy-Rifle Walkthrough: Use Artillery to destroy the right Cannon. Deploy your Troops in middle of the beach. Shock the Rocket Launchers. After destroying the Machine Guns and Flamethrower, Flare your Troops to the other Cannon and destroy it. You will be in the Rocket Launchers' blind spots. Proceed to destroy the Headquarters.
| |
| Deep Pockets | |
 | |
|
Buildings:
|
Total Number of Buildings: 13 |
| Strategy
Recommended Army Composition: Heavy-Zooka Walkthrough: Deploy your Troops on the right side of the beach, away from the Cannon. Have them attack from the right side. Once half of the Defenses are gone you can proceed to attack the HQ. Support your Troops if necessary using your Gunboat.
| |
| Demolition Squad | |
 | |
|
Buildings: |
Total Number of Buildings: 7 |
| Strategy
Recommended Army Composition: Heavy-Zooka Walkthrough: Deploy your Troops and support your Heavies with Medkits as they take fire from the Mortars. Let them destroy the five Mortars. Proceed to attack the HQ. Shock the Cannon if it attacks your Heavies.
| |
| Detonation | |
 | |
|
Buildings:
|
Total Number of Buildings: 13 |
| Strategy
Recommended Army Composition: Heavy-Zooka Walkthrough: Use Artillery/Barrage to destroy the Sniper Tower and damage/destroy the Machine Gun and Mortars in front of the HQ. Deploy all Troops on the far right of the beach. Let them destroy the Machine Gun and Mortars if not destroyed already. Then go for the HQ.
| |
| Dig Deeper | |
 | |
|
Buildings:
|
Total Number of Buildings: 13 |
| Strategy
Recommended Army Composition: Warriors Walkthrough: Use Artillery to damage or destroy the Cannon. Then deploy your Warriors and Flare them to the Boom Cannon. Once that is done Flare them to the Rocket Launcher. Head for the Headquarters and you are pretty much finished.
| |
| Direct Current | |
 | |
|
Buildings:
|
Total Number of Buildings: 19 |
| Strategy
Recommended Army Composition: Walkthrough:
| |
| Displaced | |
 | |
|
Buildings:
|
Total Number of Buildings: 6 |
| Strategy
Recommended Army Composition: Riflemen Walkthrough: Use Artillery to destroy the Machine Gun and deploy your Riflemen. They should be able to overrun the two Sniper Towers.
| |
| Dockyard | |
 | |
|
Buildings:
|
Total Number of Buildings: 15 |
| Strategy
Recommended Army Composition: Riflemen or Rifle-Zooka Walkthrough: Destroy the Rocket Launcher with Artillery/Barrage. Deploy your Troops on the left side of the beac, and Flare them towards the group of Trees. Have them hug the left side of the base using Flares, then attack the HQ from there. The Defenses that can attack your Troops from there will probably not be able to take out your massed infantry in time, but Shock them if necessary.
| |
| Doctrine | |
 | |
|
Buildings:
|
Total Number of Buildings: 14 |
| Strategy
Recommended Army Composition: Riflemen Walkthrough: Destroy the Mortar and trigger the leftmost Boom Mines with Artillery or Barrage. Deploy your Troops on the left beach. Use Flares to flank away from the Machine Guns and towards the back of the base. Once that is done, let them overwhelm the Cannons, and as soon as three of the Cannons are taken down attack the HQ. The remaining Cannons won't be able to take out your Riflemen in time.
| |
| Doctrine II | |
 | |
|
Buildings:
|
Total Number of Buildings: 22 |
| Strategy
Recommended Army Composition: Warriors Walkthrough: Deploy your Warriors on the leftmost part of the beach and destroy some Supplies. Use a Barrage on the middle of the Headquarters. Shock Bomb the Mortars and the Flamethrowers as you destroy the Boom Cannon. If you have enough Gunboat Energy, you can Shock the Mortars and attack from the upper part of the HQ as the Flamethrower cannot reach your Troops.
| |
| Double Bait | |
 | |
|
Buildings:
|
Total Number of Buildings: 4 |
| Strategy
Recommended Army Composition: Warriors Walkthrough: Deploy your Warriors and Flare them to a Rocket Launcher. Drop a Medkit if necessary. Once the two Rocket Launchers are destroyed, your Warriors should target the Mortar. After that, the base is defenseless, and the HQ is at the mercy of your Warriors.
| |
| Double Boom | |
 | |
|
Buildings:
|
Total Number of Buildings: 25 |
| Strategy
Recommended Army Composition: Heavy-Zooka Walkthrough: Use Artillery/Barrage to destroy the right Boom Cannon. Deploy your Troops on the leftmost point of the beach. Flare them to the left edge of the base – directly west of leftmost Flamethrower. When the remaining Boom Cannon targets your Heavies, Shock the Boom Cannon and the two topmost Rocket Launchers. Repeat Shocking those 3 Defenses until the Boom Cannon is destroyed. The Rocket Launchers will target your Heavies. You may want to use a Medkit on your Heavies as they attack the HQ.
| |
| Double Dose | |
 | |
|
Buildings:
|
Total Number of Buildings: 11 |
| Strategy
Recommended Army Composition: Walkthrough:
| |
| Double Down | |
 | |
|
Buildings:
|
Total Number of Buildings: 25 |
| Strategy
Recommended Army Composition: Riflemen Walkthrough: Use Artillery/Barrage to destroy the Mortar in front of the the HQ. Deploy all your Riflemen on the rightmost part of the beach. Immediately Shock the central Rocket Launcher - this will disable all five of the first Defenses. Flare your Riflemen near the center Rocket Launcher - this should move the Riflemen into all three Rocket Launchers' blind spots. They will quickly take down all five Defenses. Use Artillery/Barrage to destroy the Mortar behind the HQ, and Flare your Riflemen up near the Cannons so they can attack the HQ from the right. Use any remaining Gunboat Energy to support them as you see fit. | |
| Alternate Strategy
Recommended Army Composition: Tanks Walkthrough: Simple. Use Artillery/Barrage to destroy the two touching Sniper Towers beside the Rocket Launchers. Deploy your Tanks on the rightmost part of the beach. Shock the central Rocket Launcher. Use Artillery/Barrage to destroy the two Cannons to the right of the HQ, and to soften up the Rocket Launchers that the Tanks are attacking. Flare your Tanks up to the right of the base once the Rocket Launchers are destroyed, and use any remaining Gunboat Energy to support them however you see fit.
| |
| Double Front | |
 | |
|
Buildings:
|
Total Number of Buildings: 33 |
| Strategy
Recommended Army Composition: Heavy-Zooka Walkthrough: Destroy both left Boom Cannons with Barrages and Artillery. Deploy your troops on the left side of the left beach. Let your troops destroy the Sniper Towers, Machine Guns, and Mortars. Do your best to avoid the Boom Mines. As the Rocket Launchers fire on your troops, use a Shock Bomb or Medkit. When your troops start targeting the Headquarters (be sure to Flare them if necessary), shock the Rocket Launchers. If you do not have enough energy, use Medkits on your Zookas (Heavies should be in the Rocket Launcher's blind spot). There should be enough Heavies attacking the HQ to distract the Rocket Launcher(s) as the Zookas destroy the HQ. | |
| Alternate Strategy
Recommended Army Composition: Warriors Walkthrough: Barrage the Headquarters to destroy the group of Mines. Deploy your troops on the right beach. Flare them onto the cannon (the Boom Mines shouldn't be a big deal, destroy them if necessary beforehand). Flare the HQ while making a path of Smoke Screens. Use a Shock Bomb on the Flamethrowers, Machine Guns, and Rocket Launchers.
| |
| Double Slugger II | |
 | |
|
Buildings:
|
Total Number of Buildings: 3 |
| Strategy
Recommended Army Composition: Riflemen Walkthrough: Deploy your Riflemen and damage/destroy the left Cannon with Artillery or Barrage. Flare your Riflemen to the right Cannon and destroy it. If the other Cannon was not destroyed, destroy it as well. Then let your Riflemen attack the HQ.
| |
| Double Trouble | |
 | |
|
Buildings:
|
Total Number of Buildings: 11 |
| Strategy
Recommended Army Composition: Heavy-Zooka Walkthrough: Destroy the Rocket Launchers with Artillery and Barrage. Then deploy your Troops, and Flare them to any Defense (you can collect some Gunboat Energy on the way). Shock all Defenses. When the Shock Bomb expires, drop a Medkit, and let your Troops do the work!
| |
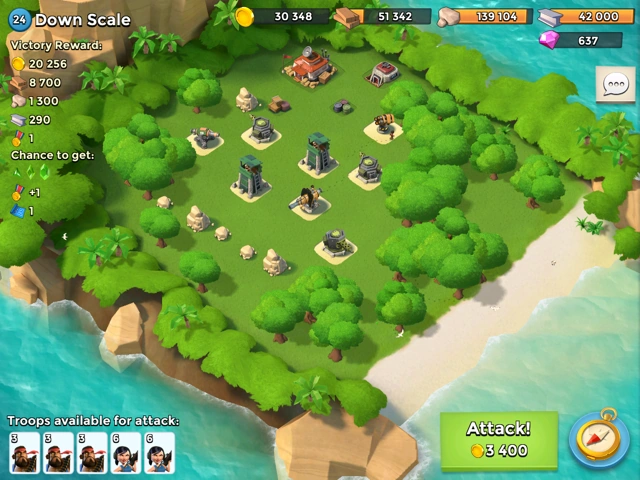
| Down Scale | |
 | |
|
Buildings:
|
Total Number of Buildings: 12 |
| Strategy
Recommended Army Composition: Warriors Walkthrough: Use Artillery or Barrage to destroy the Rocket Launcher (a Barrage should also take out the Supplies behind it). Deploy all your Warriors on the rightmost part of the beach, and drop a Flare right by the HQ - in the corner, between the HQ and the Bunker. The Warriors will be able to run straight there. Use any remaining Gunboat Energy to either Shock both the Sniper Tower and Boom Cannon, or Artillery the Sniper Tower while the Warriors take down the HQ.
| |
| Down to the Wire | |
 | |
|
Buildings:
|
Total Number of Buildings: 8 |
| Strategy
Recommended Army Composition: Riflemen Walkthrough: Deploy your Troops anywhere. After you destroy all of the Cannons, Flare your Riflemen to the Headquarters. Shock Bombs are recommended if you have not destroyed all of the Cannons within range of your Riflemen. | |
| Alternate Strategy
Recommended Army Composition: Zookas Walkthrough: Use Artillery (and/or Barrage if you have it) to destroy the Cannon that is second from the left, then deploy your Zookas on the left side beach. Allow them to destroy the Cannon south-west of the HQ while supported by a Shock Bomb to stop the Cannon if possible, then afterwards use Flares if necessary to position your Zookas correctly so that they can hit the HQ while untouched by any of the remaining Cannons. You should then quickly claim victory over the base with minimal casualties.
| |
| Drastic Destruction | |
 | |
|
Buildings:
|
Total Number of Buildings: 56 |
| Strategy
Recommended Army Composition: Tank-Medic Walkthrough: Destroy the Rocket Launchers and trigger the Boom Mines with Artillery and Barrage. Deploy your Troops at the left part of the beach. Once all the Defenses ranging the left part of the beach are gone, Flare your Troops to the HQ. | |
| Alternate Strategy
Recommended Army Composition: Warriors Walkthrough: Use a Barrage to take out the cluster of Mines around the HQ and in the Warriors' path. Then, use Flares and Smoke Screens to get the Warriors on the HQ and watch as it goes down.
| |
| Dress Left | |
 | |
|
Buildings:
|
Total Number of Buildings: 11 |
| Strategy
Recommended Army Composition: Heavy-Zooka Walkthrough: Destroy the Rocket Launcher using Artillery or Barrage. Deploy your Troops and Flare them to the Cannon. Try to dodge the Boom Mine, or detonate it with an Artillery. Shock the Cannon and Flamethrower, and destroy them. Then go for the HQ.
| |
| Duo Queue | |
 | |
|
Buildings:
|
Total Number of Buildings: 12 |
| Strategy
Recommended Army Composition: Riflemen Walkthrough: Destroy the Machine Gun with Artillery or Barrage. A Barrage will trigger some Mines as well. Deploy your Troops and let them overrun the Cannons, Boom Cannons and Sniper Towers, using Medkits to heal up from Mine damage.
| |
| Dynamite | |
 | |
|
Buildings:
|
Total Number of Buildings: 11 |
| Strategy
Recommended Army Composition: Heavies Walkthrough: Deploy all your Troops. Flare them to the Rocket Launcher's blind spot, and destroy it. Attack the Supplies, Quarry, and Stone Storage to get more Gunboat Energy if you wish. Then go for the HQ.
| |