No edit summary Tag: rte-wysiwyg |
(Updated a trivia point) Tag: rte-wysiwyg |
||
| Line 41: | Line 41: | ||
==Trivia== |
==Trivia== |
||
*The Doom Cannon has the highest damage per second and damage per shot of all the defenses in the game. |
*The Doom Cannon has the highest damage per second and damage per shot of all the defenses in the game. |
||
| − | *A Doom Cannon on a player's base could theoretically deal a maximum of |
+ | *A Doom Cannon on a player's base could theoretically deal a maximum of 117,180 damage per shot. It would require the best Defensive Building Damage [[Statue|Masterpiece]], 9 of the best [[Statue|Guardians]] boosted with [[Power Powder]], and three Mark III [[Damage Amplifier]]s. |
<center> |
<center> |
||
Revision as of 04:40, 11 May 2017
 |
 |
 |
| Mark 1 | Mark 2 | Mark 3 |
Summary
- The Doom Cannon is a Prototype Defense that is built in the Weapon Lab.
- Like all Prototype Defenses, it will only last 7 days after it is placed on your base.
- This defense slowly fires green energy blasts that deal extremely high damage. Only Scorchers are likely to be able to survive a shot from the Doom Cannon.
- It has a very small splash radius.
Offensive Strategy
- Like the Boom Cannon, the Doom Cannon fires very slowly and thus is very vulnerable to massed infantry attacks. This means Riflemen and/or Zookas or a Warrior attack will be your best chance to deal with this defense.
- The splash radius means that surrounding the Doom Cannon is likely your best means to keep the Doom Cannon from firing at your troops. Critters placed on top of the Doom Cannon work best for this purpose, but note that they will still be vulnerable to other defenses!
Defensive Strategy
- Try to place Doom Cannons away from Boom Cannons to stop attackers from disabling multiple high damage-per-shot defenses with one Shock Bomb.
- Place Doom Cannons behind splash defenses. This allows them to shoot many times, while at the same time being protected from massed infantry.
- It is likely that attackers will surround the Doom Cannon with Critters to mitigate its splash radius. To combat this, place the Doom Cannon under the protection of area damage defenses such as Flamethrowers and Mortars to wipe out distractions quickly and allow it to focus on destroying enemy troops.
- Similar to the Boom Cannon, the Doom Cannon is very effective in damaging high-health troops like Tanks and Scorchers.
Version Differences
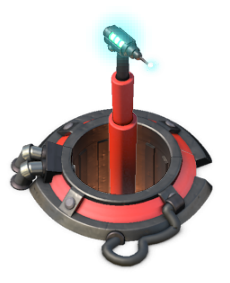
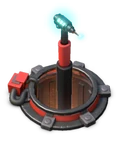
- At Mark I, the Doom Cannon appears as a small glowing turret on a red-and-black stand in a pit lined with black railing. A red box and some wires are connected to it.
- At Mark II, the Doom Cannon has a more refined pit wall and red and black covering around the railing.
- At Mark III, the Doom Cannon has more improved covering around the rail, and the lower portion of the stand turns red. A wire is added at the base. The red box is replaced with two gray pipes. A third long pipe also appears at the front.
Trivia
- The Doom Cannon has the highest damage per second and damage per shot of all the defenses in the game.
- A Doom Cannon on a player's base could theoretically deal a maximum of 117,180 damage per shot. It would require the best Defensive Building Damage Masterpiece, 9 of the best Guardians boosted with Power Powder, and three Mark III Damage Amplifiers.
Statistics
| Building Size |
Range |
Attack Speed |
Damage Type |
Splash Radius |
|---|---|---|---|---|
| 3x3 | 18 | 3.5s | Splash | 0.75 Tiles |
| Mark Number |
Health |
Damage Per Second |
Damage Per Shot |
Build Cost | Build Time |
Weapon Lab level Required | |||
|---|---|---|---|---|---|---|---|---|---|
| Fuses |
Gears |
Rods |
Capacitors | ||||||
| 1 | 15,000 | 1,500 | 5,250 | 0 | 3 | 0 | 3 | 1h | 1 |
| 2 | 20,000 | 2,500 | 8,750 | 3 | 6 | 0 | 3 | 4h | 3 |
| 3 | 25,000 | 4,500 | 15,750 | 0 | 3 | 9 | 6 | 12h | 5 |