No edit summary |
m (Reverted edits by Joe handy2 (talk) to last version by Mr. Missed Her) |
||
| Line 44: | Line 44: | ||
*Machine Guns have moderate range and a fast rate of fire, but they deal low damage and have poor accuracy. Their accuracy generally increases as the distance from the target decreases. |
*Machine Guns have moderate range and a fast rate of fire, but they deal low damage and have poor accuracy. Their accuracy generally increases as the distance from the target decreases. |
||
*The Machine Gun is very effective against large groups of [[Rifleman|Riflemen]], [[Warrior]]s, and [[Zooka]]s, as they can hit more than one target at once. |
*The Machine Gun is very effective against large groups of [[Rifleman|Riflemen]], [[Warrior]]s, and [[Zooka]]s, as they can hit more than one target at once. |
||
| − | *The Machine Gun has a small blind spot where it cannot fire upon. Reaching the blind spot is very dangerous as the Machine Gun can do great damage against units that are very close to its blind spot |
+ | *The Machine Gun has a small blind spot where it cannot fire upon. Reaching the blind spot is very dangerous as the Machine Gun can do great damage against units that are very close to its blind spot. |
==Offensive Strategy== |
==Offensive Strategy== |
||
Revision as of 01:35, 4 July 2019

|
|
|
|
| Level 1 | Level 2 | Level 3 | Level 4 |
|
|
|
|
| Level 5 | Level 6-7 | Level 8 | Level 9-10 |
|
|
|
|
| Level 11-14 | Level 15-20 | Level 21 | Level 22 |
Summary
- The Machine Gun is the third defense to unlock in the game.
- Machine Guns have moderate range and a fast rate of fire, but they deal low damage and have poor accuracy. Their accuracy generally increases as the distance from the target decreases.
- The Machine Gun is very effective against large groups of Riflemen, Warriors, and Zookas, as they can hit more than one target at once.
- The Machine Gun has a small blind spot where it cannot fire upon. Reaching the blind spot is very dangerous as the Machine Gun can do great damage against units that are very close to its blind spot.
Offensive Strategy
- Deploying Heavies in front of Riflemen or Zookas is a very effective way of protecting them from Machine Guns. However, although having a single Heavy can protect Zookas, one Heavy will not protect Riflemen. This is due to the Machine Gun's inaccuracy, as bullets tend to miss the meat shield and harm the supporting troops.
- The closer your troops are to the Machine Gun, the more accurately it fires. If possible, try to destroy it from a distance.
- Grenadiers can outrange Machine Guns completely, while Tanks and Zookas have a long enough range to render the Machine Gun less effective. However, the Machine Gun should not be ignored in the latter case, since a few shots can still easily take down Zookas.
- Warriors can be chewed up if near a Machine Gun, but they can easily heal through the occasional bullet if they are attacking something else at the edge of the Machine Gun's range.
- Critters and Warriors can easily take down a lone Machine Gun due to its blind spot rendering it unable to attack back.
Defensive Strategy
- Machine Guns are very effective front-line defenses, as they stop weak troops like the Rifleman or Zooka from advancing into your base.
- Placing Machine Guns near Boom Cannons or Rocket Launchers can help prevent other players from trying to target them with weak troops.
- They are a good alternative to Flamethrowers when defending against Warriors. Because of its accuracy at fairly short range, they can destroy Warriors attacking a nearby building fairly quickly. Due to their blind spot, however, they should not be placed right next to important buildings, but at a distance such that they are just about able to cover all sides of the building.
Upgrade Differences
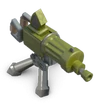
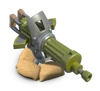
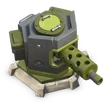
- Initially, the Machine Gun is a green gun mounted on a silver stand, and there are two silver handles on the back.
- At level 2, the Machine Gun gains a small magazine on the back, and the front of the barrel becomes smaller and ridged.
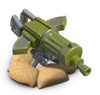
- At level 3, the Machine Gun gains sandbags around one half of it, and the magazine on top is removed and replaced with two magazines, one on each side.
- At level 4, the Machine Gun gains a small frontal shield.
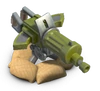
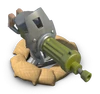
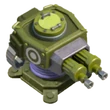
- At level 5, the Machine Gun gets slightly bigger, it gains a larger frontal shield, and its handles are reinforced. The whole barrel becomes thinner.
- At level 6, the magazines are removed and a pan magazine is added at the back of the Machine Gun, behind the shield. The sandbags are extended to the entire perimeter of the Machine Gun and the shield grows slightly in size.
- At level 8, the stand is reinforced. The barrel loses its ridged pattern and now has holes in it. A green dot is added on top of the pan magazine. The back handles are moved away from each other.
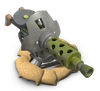
- At level 9, the Machine Gun loses all its sandbags. It gains a stone base, a modified handle system, and a bigger and more reinforced frontal shield which covers the entire gun and is more angular. The pan magazine is removed and replaced by two ammunition belts converging together in the back.
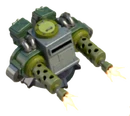
- At level 11, the Machine Gun gains a back shield and loses its handles, becoming hexagonal. The ammunition belts are removed. A box can be seen on the side, possibly replacing the belts. A small green hatch is added on the top.
- At level 15, the base turns green and becomes steel. The body becomes a square and turns green as well. Another barrel is added, and both resemble the level 6 Machine Gun barrel.
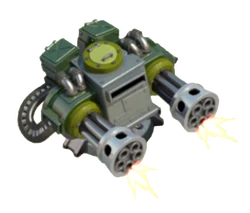
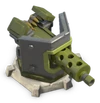
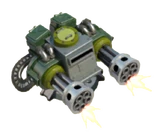
- At level 21, the Machine Gun turns massive and gains a new color scheme of dark green, light green, and grey. A large metal cockpit with a thin, rectangular viewport now sits upon a small, steel baseplate, with a light green hatch on top. The two barrels once again resemble the level 8 barrels. They are held up by two large dark green arms with silver piping on top. Two large, dark green ammo boxes sit on the back of the structure.
- At level 22, the barrels now turn into a set of five, and resemble miniguns. An ammo belt is seen attached to each.
Trivia
- Machine Guns were invented in the mid-19th century and have been used in war to this day.
- The Machine Gun is the third fastest-firing Defensive Building in the game. In first and second place are the Shock Blaster and MMG 9000 respectively.
- The Machine Gun has the lowest hitpoints of any maximum-level defensive building.
- Despite visibly having magazines attached to it, the Machine Gun has no need to reload while firing.
- The level 1 Machine Gun bears a moderate resemblance to the real-life Maxim machine gun, as well as a much smaller resemblance to the real-life Browning M1917, which had a similar looking water jacket.
- A Machine Gun could fire up to 2,400 bullets in a single battle.
- If a level 22 Machine Gun is Shock Bombed while it is firing, the barrels will continue spinning while it is shocked.
- Although the level 15 upgrade adds a permanent secondary barrel to the machine gun, the fire rate does not increase. This is most notable at level 22 when the barrels appear to spin faster than the fire rate suggests.
Statistics
| HQ Level | 1 | 2 | 3 | 4 | 5 | 6 | 7 | 8 | 9 | 10 | 11 | 12 | 13 | 14 | 15 | 16 | 17 | 18 | 19 | 20 | 21 | 22 | 23 | 24 | 25 |
|---|---|---|---|---|---|---|---|---|---|---|---|---|---|---|---|---|---|---|---|---|---|---|---|---|---|
| Number Available | 0 | 0 | 0 | 1 | 1 | 2 | 2 | 2 | 2 | 3 | 3 | 3 | 4 | 4 | 4 | 5 | 5 | 5 | 5 | 5 | 5 | 5 | 5 | 5 | 5 |
| Building Size |
Range |
Attack Speed |
Damage Type |
Splash Radius |
Random Radius |
|---|---|---|---|---|---|
| 3x3 | 2.5-9 | 0.1 Second | Splash | 0.6 Tiles | 0.8 Tiles |
| Level |
Hitpoints |
Typical Damage Per Second^ |
Maximum Damage Per Second |
Damage Per Shot |
Upgrade Cost | Upgrade Time |
Instant |
Headquarters Level Required |
XP Gain | ||
|---|---|---|---|---|---|---|---|---|---|---|---|
| Wood |
Stone |
Iron | |||||||||
| 1 | 1,600 | 12 | 87 | 8.7 | 3,300 | N/A | N/A | 1h | 37 | 4 | 10 |
| 2 | 1,740 | 14 | 99 | 9.9 | 4,600 | N/A | N/A | 1h 15m | 45 | 4 | 11 |
| 3 | 1,890 | 15 | 111 | 11.1 | 8,800 | N/A | N/A | 1h 45m | 64 | 5 | 13 |
| 4 | 2,060 | 18 | 126 | 12.6 | 10,000 | N/A | N/A | 2h | 71 | 5 | 14 |
| 5 | 2,240 | 20 | 142 | 14.2 | 13,200 | 2,320 | N/A | 2h 15m | 92 | 6 | 15 |
| 6 | 2,440 | 22 | 160 | 16.0 | 14,900 | 2,610 | N/A | 2h 30m | 99 | 6 | 15 |
| 7 | 2,700 | 25 | 180 | 18.0 | 22,500 | 4,500 | N/A | 3h | 126 | 7 | 17 |
| 8 | 2,900 | 29 | 203 | 20.3 | 38,000 | 8,400 | N/A | 4h | 175 | 8 | 20 |
| 9 | 3,100 | 32 | 229 | 22.9 | 60,000 | 14,400 | 3,800 | 5h | 247 | 9 | 22 |
| 10 | 3,400 | 36 | 258 | 25.8 | 97,000 | 24,300 | 7,800 | 6h | 334 | 10 | 26 |
| 11 | 3,700 | 41 | 291 | 29.1 | 134,000 | 49,000 | 14,000 | 7h | 434 | 11 | 28 |
| 12 | 4,000 | 47 | 329 | 32.9 | 205,000 | 96,000 | 25,200 | 8h | 588 | 12 | 31 |
| 13 | 4,400 | 53 | 371 | 37.1 | 295,000 | 177,000 | 50,000 | 10h | 790 | 13 | 34 |
| 14 | 4,800 | 59 | 418 | 41.8 | 420,000 | 360,000 | 100,000 | 12h | 1,106 | 14 | 42 |
| 15 | 5,200 | 67 | 471 | 47.1 | 730,000 | 550,000 | 201,000 | 14h | 1,529 | 15 | 48 |
| 16 | 5,700 | 76 | 532 | 53.2 | 1,040,000 | 930,000 | 410,000 | 16h | 2,098 | 16 | 59 |
| 17 | 6,200 | 85 | 599 | 59.9 | 1,510,000 | 1,240,000 | 790,000 | 18h | 2,756 | 17 | 62 |
| 18 | 6,700 | 96 | 676 | 67.6 | 1,880,000 | 1,710,000 | 1,120,000 | 20h | 3,354 | 18 | 63 |
| 19 | 7,300 | 108 | 762 | 76.2 | 2,150,000 | 2,090,000 | 1,640,000 | 22h | 3,936 | 19 | 67 |
| 20 | 7,900 | 122 | 859 | 85.9 | 2,430,000 | 2,430,000 | 2,420,000 | 1d | 4,574 | 20 | 69 |
| 21 | 8,600 | 138 | 969 | 96.9 | 2,760,000 | 2,540,000 | 2,980,000 | 1d 2h | 5,021 | 21 | 71 |
| 22 | 9,460 | 156 | 1,093 | 109.3 | 3,150,000 | 2,900,000 | 3,400,000 | 1d 4h | 5,514 | 22 | 74 |
^ All shots may not hit, so the game's stated damage per second is approximate. Accuracy improves as targets move closer.