No edit summary Tag: sourceedit |
m (Reverted edits by 007penannt (talk) to last version by King Dragonhoff) |
||
| (12 intermediate revisions by 8 users not shown) | |||
| Line 11: | Line 11: | ||
*If you own a Resource Base, you have the ability to adjust the placement of its buildings, just as you would on your own base. |
*If you own a Resource Base, you have the ability to adjust the placement of its buildings, just as you would on your own base. |
||
*Every time a Resource Base is destroyed, the base's [[Defensive Buildings]] are upgraded or new [[Defensive Buildings]] can appear. Sometimes, both occur. The [[Defensive Buildings]] cannot be upgraded in any other way. |
*Every time a Resource Base is destroyed, the base's [[Defensive Buildings]] are upgraded or new [[Defensive Buildings]] can appear. Sometimes, both occur. The [[Defensive Buildings]] cannot be upgraded in any other way. |
||
| − | **[[Shock Launcher]]s |
+ | **[[Shock Launcher]]s, [[Prototype Defenses]], [[Boom Mine]]s, and [[Shock Mine]]s will never appear on Resource Bases. |
**The collector building on a resource base will never level up, however. Each Resource Base island has a fixed production building level. To get a resource base with a higher level collector building, you will have to conquer a resource base that is farther away from your home base. |
**The collector building on a resource base will never level up, however. Each Resource Base island has a fixed production building level. To get a resource base with a higher level collector building, you will have to conquer a resource base that is farther away from your home base. |
||
*They provide you with shipments of [[Wood]], [[Stone]] or [[Iron]] (depending on the kind of resource base you have) directly to your island. |
*They provide you with shipments of [[Wood]], [[Stone]] or [[Iron]] (depending on the kind of resource base you have) directly to your island. |
||
| − | **These shipments can be collected from the [[Resource Boat]] |
+ | **These shipments can be collected from the [[Resource Boat]] that appears just south of your docks. |
| − | ***Just like normal production buildings on your base, |
+ | ***Just like normal production buildings on your base, this boat can fill up. The capacity of the boat for a particular resource is equal to the combined sum of all your Resource Bases of that [[Resources|Resource]] type's production capacity. '''Basically, if one of your Resource Bases' collectors fills up, you will have to collect from the boat for that base's collector to start producing again.''' This means that overall Resource Base production progressively slows down after a few hours (because lower-level Resource Bases fill up with resources) and stops eventually. |
*The first [[Wood]] Resource Base can be found with a level 3 [[Radar]]. |
*The first [[Wood]] Resource Base can be found with a level 3 [[Radar]]. |
||
*The first [[Stone]] Resource Base can be found with a level 6 [[Radar]]. |
*The first [[Stone]] Resource Base can be found with a level 6 [[Radar]]. |
||
| Line 22: | Line 22: | ||
==Trivia== |
==Trivia== |
||
*You can clear [[Obstacles]] on your Resource Bases, such as trees and stones. The [[Obstacles]] that are cleared never respawn, even if they are cleared by an opponent when he/she holds the base. |
*You can clear [[Obstacles]] on your Resource Bases, such as trees and stones. The [[Obstacles]] that are cleared never respawn, even if they are cleared by an opponent when he/she holds the base. |
||
| − | **This method can be used to deny extra resources from a player that successfully annexes one of your resource bases. |
+ | **This method can be used to deny extra resources from a player that successfully annexes one of your resource bases. |
*Occasionally, you will come across a Resource Base that, instead of being called<br />"(Player's name)'s Resource Base", is simply called "Resource Base". This is a new Resource Base, meaning you were the first player to have discovered it. The game has to put new Resource Bases into circulation regularly so that there are enough to go around. |
*Occasionally, you will come across a Resource Base that, instead of being called<br />"(Player's name)'s Resource Base", is simply called "Resource Base". This is a new Resource Base, meaning you were the first player to have discovered it. The game has to put new Resource Bases into circulation regularly so that there are enough to go around. |
||
**These bases typically have an [[Outpost]] with relatively low health. After being annexed, the outpost will level up. |
**These bases typically have an [[Outpost]] with relatively low health. After being annexed, the outpost will level up. |
||
| Line 28: | Line 28: | ||
**The production per hour by conquering all Resource Bases of one type is 15,140. |
**The production per hour by conquering all Resource Bases of one type is 15,140. |
||
*[[Freed Village]]s serve as [[Gold]] 'resource bases', which is why there are no [[Gold]] resource bases. |
*[[Freed Village]]s serve as [[Gold]] 'resource bases', which is why there are no [[Gold]] resource bases. |
||
| − | *If a Resource Base does not have any more space to add new defenses and all present defenses are maxed, nothing will happen. |
+ | *If a Resource Base does not have any more space to add new defenses and all present defenses are maxed, nothing will happen if it is conquered. |
*Resource Bases not yet discovered are teased through the clouds. If tapped, a message will appear saying, "This region has a resource base". |
*Resource Bases not yet discovered are teased through the clouds. If tapped, a message will appear saying, "This region has a resource base". |
||
*Resource Bases will never yield [[Power Stone]]s, [[Prototype Modules]], [[Intel]], or [[Resources]] that it does not produce when conquered. They only give a [[Victory Point]] (always 1) and the resource it produces. This means that gold will always be lost in an attack, even if you win with no casualties due to the [[Experience|attack cost]]. |
*Resource Bases will never yield [[Power Stone]]s, [[Prototype Modules]], [[Intel]], or [[Resources]] that it does not produce when conquered. They only give a [[Victory Point]] (always 1) and the resource it produces. This means that gold will always be lost in an attack, even if you win with no casualties due to the [[Experience|attack cost]]. |
||
| Line 34: | Line 34: | ||
*Pressing the base's icon on your [[Map]] will reveal the production rate of its resource type. |
*Pressing the base's icon on your [[Map]] will reveal the production rate of its resource type. |
||
*The lowest possible [[Experience]] level of a resource base is level three. |
*The lowest possible [[Experience]] level of a resource base is level three. |
||
| + | *There's an [[Achievements|achievement]] which is called War Production that gives a total of 90 diamonds upon controlling a total of 35 Resource Bases (out of the possible 42). |
||
---- |
---- |
||
{{ArchipelagoMap}} |
{{ArchipelagoMap}} |
||
---- |
---- |
||
| − | |||
<div class="table-back"> |
<div class="table-back"> |
||
{| class="rb-table" style="text-align: center; width: 100%;" |
{| class="rb-table" style="text-align: center; width: 100%;" |
||
| Line 91: | Line 91: | ||
|- |
|- |
||
!5 |
!5 |
||
| − | | {{New|2}} || 0 || 0 || |
+ | | {{New|2}} || 0 || 0 ||{{New|2}}|| 0 || 0 || 0 || 0 || 0 || 0 || 0 || 0 || 0 || 0 || 0 || 0 || 0 || 0 || 0 || 0 || 0 || '''4''' || '''0''' || '''0''' |
|- |
|- |
||
!6 |
!6 |
||
| Line 97: | Line 97: | ||
|- |
|- |
||
!7 |
!7 |
||
| − | | 2 || {{New|2}} || 0 || 2 || |
+ | | 2 || {{New|2}} || 0 || 2 ||{{New|1}} || 0 ||{{New|1}} || 0 || 0 || 0 || 0 || 0 || 0 || 0 || 0 || 0 || 0 || 0 || 0 || 0 || 0 || '''5''' || '''3''' || '''0''' |
|- |
|- |
||
!8 |
!8 |
||
| − | | 2 || 2 || 0 || 2 || {{New|2}} || 0 || |
+ | | 2 || 2 || 0 || 2 || {{New|2}} || 0 ||{{New|2}} || 0 || 0 || 0 || 0 || 0 || 0 || 0 || 0 || 0 || 0 || 0 || 0 || 0 || 0 || '''6''' || '''4''' || '''0''' |
|- |
|- |
||
!9 |
!9 |
||
| − | | 2 || 2 || {{New|1}} || 2 || 2 || 0 || 2 || |
+ | | 2 || 2 || {{New|1}} || 2 || 2 || 0 || 2 ||{{New|1}} || 0 || 0 || 0 || 0 || 0 || 0 || 0 || 0 || 0 || 0 || 0 || 0 || 0 || '''6''' || '''5''' || '''1''' |
|- |
|- |
||
!10 |
!10 |
||
| − | | 2 || 2 || {{New|2}} || 2 || 2 || 0 || 2 || |
+ | | 2 || 2 || {{New|2}} || 2 || 2 || 0 || 2 ||{{New|2}} || 0 || 0 || 0 || 0 || 0 || 0 || 0 || 0 || 0 || 0 || 0 || 0 || 0 || '''6''' || '''6''' || '''2''' |
|- |
|- |
||
!11 |
!11 |
||
| − | | 2 || 2 || 2 || 2 || 2 || {{New|2}} || 2 || 2 || 0 ||{{New|1}} || 0 || 0 || 0 || 0 || 0 || 0 || 0 || 0 || 0 || 0 || 0 || '''7''' || '''6''' || '''4''' |
+ | | 2 || 2 || 2 || 2 || 2 || {{New|2}} || 2 || 2 || 0 ||{{New|1}} || 0 || 0 || 0 || 0 || 0 || 0 || 0 || 0 || 0 || 0 || 0 || '''7''' || '''6''' || '''4''' |
|- |
|- |
||
!12 |
!12 |
||
| − | | 2 || 2 || 2 || 2 || 2 || 2 || 2 || 2 || 0 || {{New|2}} || |
+ | | 2 || 2 || 2 || 2 || 2 || 2 || 2 || 2 || 0 || {{New|2}} ||{{New|1}} || 0 ||{{New|1}} || 0 || 0 || 0 || 0 || 0 || 0 || 0 || 0 || '''9''' || '''7 ''' || '''4''' |
|- |
|- |
||
!13 |
!13 |
||
| − | | 2 || 2 || 2 || 2 || 2 || 2 || 2 || 2 || {{New|1}} || 2 || |
+ | | 2 || 2 || 2 || 2 || 2 || 2 || 2 || 2 || {{New|1}} || 2 ||{{New|2}} || 0 ||{{New|2}} || 0 || 0 || 0 || 0 || 0 || 0 || 0 || 0 || '''10''' || '''8''' || '''5''' |
|- |
|- |
||
!14 |
!14 |
||
| − | | 2 || 2 || 2 || 2 || 2 || 2 || 2 || 2 || {{New|2}} || 2 || 2 || 0 || 2 ||{{New|2}} || 0 || 0 || 0 || 0 || 0 || 0 || 0 || '''10''' || '''10''' || '''6''' |
+ | | 2 || 2 || 2 || 2 || 2 || 2 || 2 || 2 || {{New|2}} || 2 || 2 || 0 || 2 ||{{New|2}} || 0 || 0 || 0 || 0 || 0 || 0 || 0 || '''10''' || '''10''' || '''6''' |
|- |
|- |
||
!15 |
!15 |
||
| − | | 2 || 2 || 2 || 2 || 2 || 2 || 2 || 2 || 2 || 2 || 2 || {{New|2}} || 2 || 2 || 0 || |
+ | | 2 || 2 || 2 || 2 || 2 || 2 || 2 || 2 || 2 || 2 || 2 || {{New|2}} || 2 || 2 || 0 ||{{New|1}} || 0 || 0 || 0 || 0 || 0 || '''11''' || '''10''' || '''8''' |
|- |
|- |
||
!16 |
!16 |
||
| − | | 2 || 2 || 2 || 2 || 2 || 2 || 2 || 2 || 2 || 2 || 2 || 2 || 2 || 2 || 0 || {{New|2}} || |
+ | | 2 || 2 || 2 || 2 || 2 || 2 || 2 || 2 || 2 || 2 || 2 || 2 || 2 || 2 || 0 || {{New|2}} ||{{New|1}} || 0 || 0 || 0 || 0 || '''12''' || '''11''' || '''8''' |
|- |
|- |
||
!17 |
!17 |
||
| − | | 2 || 2 || 2 || 2 || 2 || 2 || 2 || 2 || 2 || 2 || 2 || 2 || 2 || 2 ||{{New|1}} || 2 || |
+ | | 2 || 2 || 2 || 2 || 2 || 2 || 2 || 2 || 2 || 2 || 2 || 2 || 2 || 2 ||{{New|1}} || 2 ||{{New|2}} || 0 ||{{New|1}} || 0 || 0 || '''13''' || '''12''' || '''9''' |
|- |
|- |
||
!18 |
!18 |
||
| − | | 2 || 2 || 2 || 2 || 2 || 2 || 2 || 2 || 2 || 2 || 2 || 2 || 2 || 2 || {{New|2}}|| 2 || 2 || 0 || |
+ | | 2 || 2 || 2 || 2 || 2 || 2 || 2 || 2 || 2 || 2 || 2 || 2 || 2 || 2 || {{New|2}}|| 2 || 2 || 0 ||{{New|2}}||{{New|1}} || 0 || '''14''' || '''13''' || '''10''' |
|- |
|- |
||
!19 |
!19 |
||
| − | | 2 || 2 || 2 || 2 || 2 || 2 || 2 || 2 || 2 || 2 || 2 || 2 || 2 || 2 || 2 || 2 || 2 ||{{New|2}} || 2 || |
+ | | 2 || 2 || 2 || 2 || 2 || 2 || 2 || 2 || 2 || 2 || 2 || 2 || 2 || 2 || 2 || 2 || 2 ||{{New|2}} || 2 ||{{New|2}} || 0 || '''14''' || '''14''' || '''12''' |
|- |
|- |
||
!20 |
!20 |
||
Revision as of 03:21, 1 March 2019
General Information
- Resource Bases are additional bases that are independent of your home base and are scattered throughout the Archipelago.
- Once you uncover one in the Archipelago, you can attack it and destroy it. Once destroyed, you gain ownership of it.
- Other players can do this too, so you may have to re-conquer a Resource Base whenever it is taken over by other players.
- If you own a Resource Base, you have the ability to adjust the placement of its buildings, just as you would on your own base.
- Every time a Resource Base is destroyed, the base's Defensive Buildings are upgraded or new Defensive Buildings can appear. Sometimes, both occur. The Defensive Buildings cannot be upgraded in any other way.
- Shock Launchers, Prototype Defenses, Boom Mines, and Shock Mines will never appear on Resource Bases.
- The collector building on a resource base will never level up, however. Each Resource Base island has a fixed production building level. To get a resource base with a higher level collector building, you will have to conquer a resource base that is farther away from your home base.
- They provide you with shipments of Wood, Stone or Iron (depending on the kind of resource base you have) directly to your island.
- These shipments can be collected from the Resource Boat that appears just south of your docks.
- Just like normal production buildings on your base, this boat can fill up. The capacity of the boat for a particular resource is equal to the combined sum of all your Resource Bases of that Resource type's production capacity. Basically, if one of your Resource Bases' collectors fills up, you will have to collect from the boat for that base's collector to start producing again. This means that overall Resource Base production progressively slows down after a few hours (because lower-level Resource Bases fill up with resources) and stops eventually.
- These shipments can be collected from the Resource Boat that appears just south of your docks.
- The first Wood Resource Base can be found with a level 3 Radar.
- The first Stone Resource Base can be found with a level 6 Radar.
- The first Iron Resource Base can be found with a level 9 Radar.
Trivia
- You can clear Obstacles on your Resource Bases, such as trees and stones. The Obstacles that are cleared never respawn, even if they are cleared by an opponent when he/she holds the base.
- This method can be used to deny extra resources from a player that successfully annexes one of your resource bases.
- Occasionally, you will come across a Resource Base that, instead of being called
"(Player's name)'s Resource Base", is simply called "Resource Base". This is a new Resource Base, meaning you were the first player to have discovered it. The game has to put new Resource Bases into circulation regularly so that there are enough to go around.- These bases typically have an Outpost with relatively low health. After being annexed, the outpost will level up.
- You can have up to a maximum of 14 Wood, Stone, and Iron bases.
- The production per hour by conquering all Resource Bases of one type is 15,140.
- Freed Villages serve as Gold 'resource bases', which is why there are no Gold resource bases.
- If a Resource Base does not have any more space to add new defenses and all present defenses are maxed, nothing will happen if it is conquered.
- Resource Bases not yet discovered are teased through the clouds. If tapped, a message will appear saying, "This region has a resource base".
- Resource Bases will never yield Power Stones, Prototype Modules, Intel, or Resources that it does not produce when conquered. They only give a Victory Point (always 1) and the resource it produces. This means that gold will always be lost in an attack, even if you win with no casualties due to the attack cost.
- If you defend a Resource Base, you will not get any Diamonds or Intel from it, even if enough troops are destroyed.
- Pressing the base's icon on your Map will reveal the production rate of its resource type.
- The lowest possible Experience level of a resource base is level three.
- There's an achievement which is called War Production that gives a total of 90 diamonds upon controlling a total of 35 Resource Bases (out of the possible 42).
Map of the Archipelago with all Resource Base Locations
View the full-size image here
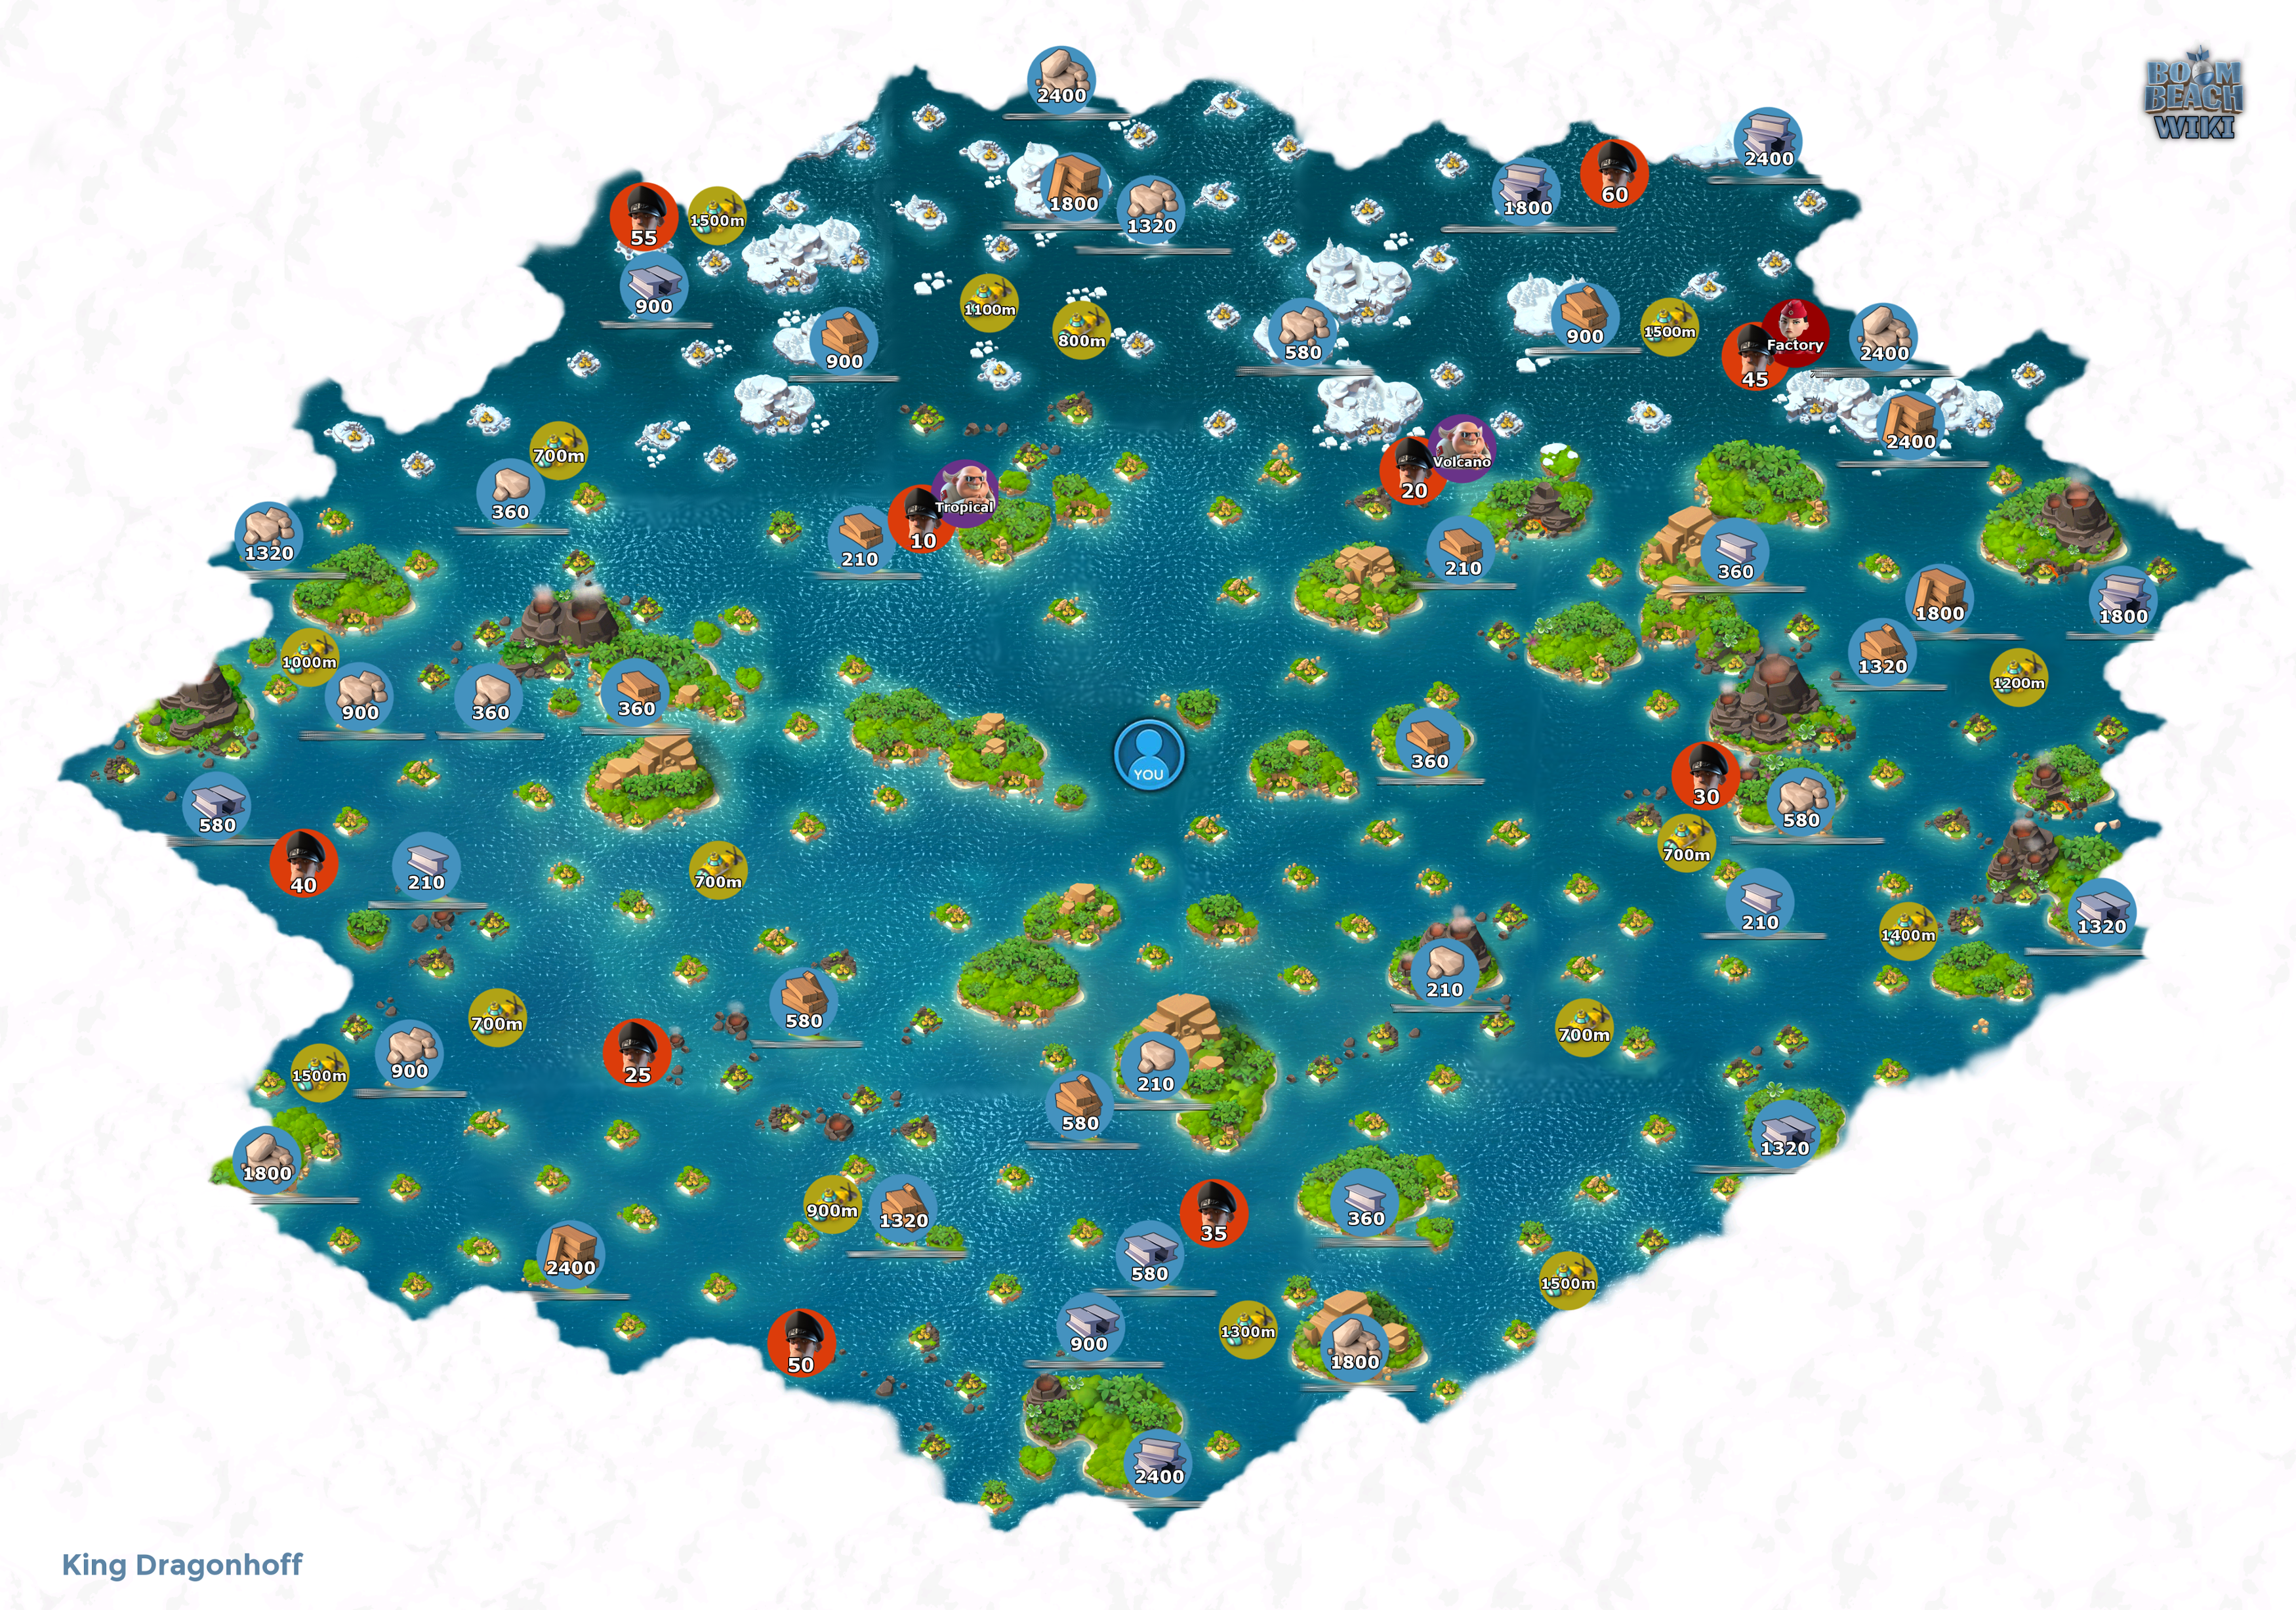
| Radar level | Production Per Hour | |||||||||||||||||||||||
|---|---|---|---|---|---|---|---|---|---|---|---|---|---|---|---|---|---|---|---|---|---|---|---|---|
| 210 | 360 | 580 | 900 | 1320 | 1800 | 2400 | All | |||||||||||||||||
| 1 | 0 | 0 | 0 | 0 | 0 | 0 | 0 | 0 | 0 | 0 | 0 | 0 | 0 | 0 | 0 | 0 | 0 | 0 | 0 | 0 | 0 | 0 | 0 | 0 |
| 2 | 0 | 0 | 0 | 0 | 0 | 0 | 0 | 0 | 0 | 0 | 0 | 0 | 0 | 0 | 0 | 0 | 0 | 0 | 0 | 0 | 0 | 0 | 0 | 0 |
| 3 | 1 |
0 | 0 | 0 | 0 | 0 | 0 | 0 | 0 | 0 | 0 | 0 | 0 | 0 | 0 | 0 | 0 | 0 | 0 | 0 | 0 | 1 | 0 | 0 |
| 4 | 1 | 0 | 0 | 1 |
0 | 0 | 0 | 0 | 0 | 0 | 0 | 0 | 0 | 0 | 0 | 0 | 0 | 0 | 0 | 0 | 0 | 2 | 0 | 0 |
| 5 | 2 |
0 | 0 | 2 |
0 | 0 | 0 | 0 | 0 | 0 | 0 | 0 | 0 | 0 | 0 | 0 | 0 | 0 | 0 | 0 | 0 | 4 | 0 | 0 |
| 6 | 2 | 1 |
0 | 2 | 0 | 0 | 0 | 0 | 0 | 0 | 0 | 0 | 0 | 0 | 0 | 0 | 0 | 0 | 0 | 0 | 0 | 4 | 1 | 0 |
| 7 | 2 | 2 |
0 | 2 | 1 |
0 | 1 |
0 | 0 | 0 | 0 | 0 | 0 | 0 | 0 | 0 | 0 | 0 | 0 | 0 | 0 | 5 | 3 | 0 |
| 8 | 2 | 2 | 0 | 2 | 2 |
0 | 2 |
0 | 0 | 0 | 0 | 0 | 0 | 0 | 0 | 0 | 0 | 0 | 0 | 0 | 0 | 6 | 4 | 0 |
| 9 | 2 | 2 | 1 |
2 | 2 | 0 | 2 | 1 |
0 | 0 | 0 | 0 | 0 | 0 | 0 | 0 | 0 | 0 | 0 | 0 | 0 | 6 | 5 | 1 |
| 10 | 2 | 2 | 2 |
2 | 2 | 0 | 2 | 2 |
0 | 0 | 0 | 0 | 0 | 0 | 0 | 0 | 0 | 0 | 0 | 0 | 0 | 6 | 6 | 2 |
| 11 | 2 | 2 | 2 | 2 | 2 | 2 |
2 | 2 | 0 | 1 |
0 | 0 | 0 | 0 | 0 | 0 | 0 | 0 | 0 | 0 | 0 | 7 | 6 | 4 |
| 12 | 2 | 2 | 2 | 2 | 2 | 2 | 2 | 2 | 0 | 2 |
1 |
0 | 1 |
0 | 0 | 0 | 0 | 0 | 0 | 0 | 0 | 9 | 7 | 4 |
| 13 | 2 | 2 | 2 | 2 | 2 | 2 | 2 | 2 | 1 |
2 | 2 |
0 | 2 |
0 | 0 | 0 | 0 | 0 | 0 | 0 | 0 | 10 | 8 | 5 |
| 14 | 2 | 2 | 2 | 2 | 2 | 2 | 2 | 2 | 2 |
2 | 2 | 0 | 2 | 2 |
0 | 0 | 0 | 0 | 0 | 0 | 0 | 10 | 10 | 6 |
| 15 | 2 | 2 | 2 | 2 | 2 | 2 | 2 | 2 | 2 | 2 | 2 | 2 |
2 | 2 | 0 | 1 |
0 | 0 | 0 | 0 | 0 | 11 | 10 | 8 |
| 16 | 2 | 2 | 2 | 2 | 2 | 2 | 2 | 2 | 2 | 2 | 2 | 2 | 2 | 2 | 0 | 2 |
1 |
0 | 0 | 0 | 0 | 12 | 11 | 8 |
| 17 | 2 | 2 | 2 | 2 | 2 | 2 | 2 | 2 | 2 | 2 | 2 | 2 | 2 | 2 | 1 |
2 | 2 |
0 | 1 |
0 | 0 | 13 | 12 | 9 |
| 18 | 2 | 2 | 2 | 2 | 2 | 2 | 2 | 2 | 2 | 2 | 2 | 2 | 2 | 2 | 2 |
2 | 2 | 0 | 2 |
1 |
0 | 14 | 13 | 10 |
| 19 | 2 | 2 | 2 | 2 | 2 | 2 | 2 | 2 | 2 | 2 | 2 | 2 | 2 | 2 | 2 | 2 | 2 | 2 |
2 | 2 |
0 | 14 | 14 | 12 |
| 20 | 2 | 2 | 2 | 2 | 2 | 2 | 2 | 2 | 2 | 2 | 2 | 2 | 2 | 2 | 2 | 2 | 2 | 2 | 2 | 2 | 2 |
14 | 14 | 14 |