Summary
- The Rifleman is the first troop available in the game, being unlocked as soon as the game begins.
- Riflemen are decent troops with moderate HP, damage, and attack range.
- They require the lowest amount of space in the Landing Craft of any troop.
Visual Appearance
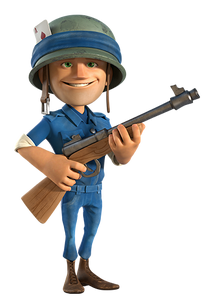
- The Rifleman appears as a fair-skinned man with a blue uniform, simple boots, and a grayish-green helmet with a blue cloth band around it. He carries a rifle and has a red ace of spades tucked into his helmet band.
Offensive Strategy
- The Rifleman is effective when deployed in large numbers.
- The Rifleman is effective when used with Heavies acting as meat shields.
- Using Heavies as meat shields will allow them to take most of the damage while the Riflemen behind them deal the damage as Heavies do not yield much damage themselves. Be warned that because Riflemen walk so close behind Heavies, they are likely to be hit by splash damage defenses such as Rocket Launchers, Machine Guns, Mortars and Shock Launchers that target your Heavies, even when the Heavies are in front of them.
- Another great strategy is Rifle-Medic. Riflemen have moderate health, so Medics will be able to heal up most of the damage that the Riflemen take from splash damage defenses. Medics' healing does have a splash effect, so they can heal Riflemen faster than any other unit (though high-level defenses can eventually overpower the healing).
- A third popular strategy with riflemen is the Rifle-Zooka strategy (Full guide by TheCoolBoss). This strategy is very weak to splash defenses due to the high amount of troops and relatively low health per troop, but this is a devistating tactic when combined with high-level Medkits and/or Medics or when used against a base with low level or at least very few splash defenses.
- The Rifleman is great to use against Cannons and Boom Cannons as these defenses are single-shot defenses, making them easily overwhelmed by Riflemen hordes.
- Riflemen are weak against Machine Guns, Mortars, Flamethrowers, Rocket Launchers and Shock Launchers as these defenses are multi-target, meaning that they excel at damaging groups of enemies.
- At respectable levels, Riflemen may counter Machine Gun and Rocket Launcher fire with the help of a Gunboat deployed Medkit.
- You can allow Riflemen to spread out as much as possible to minimise the effect of these defenses. However, spreading out too much will expose them to fire from too many defenses!
- Due to their large numbers and short range, Riflemen can be used to protect Tanks from Cannons and Boom Cannons.
- Use a Barrage on large groups of Mines to prevent them from killing your Riflemen quickly. If you have Critters, it can be a good alternative if Barrage gets too expensive.
- The Cryobomb is very good at clearing Mines if it is available, due to its large radius.
Defensive Strategy
- A group of Riflemen's worst enemy is the Rocket Launcher, so place it well behind other defenses.
- The Mortar is effective in taking out large numbers of Riflemen, but it fires very slowly. Having a Machine Gun in front of a Mortar will cause the Riflemen to target the Machine Gun (in the absence of a Flare), giving the Mortar more time to fire at the Riflemen.
- Place the Mortar behind various buildings so that it is difficult for the Riflemen to reach the Mortar without having any casualties, the same goes for any other slow-firing defense.
- Riflemen are vulnerable to fast firing defenses such as Sniper Towers, Machine Guns, and Flamethrowers, so place them strategically.
- Cannons and Boom Cannons can easily one-shot kill Riflemen but can be swarmed by large groups of Riflemen so be sure protect them with Sniper Towers, Machine Guns, Flamethrowers, Rocket Launchers or Shock Launchers.
- Place your Mines well. Groups of them can kill Riflemen quickly if the attacker ignores them.
- Some very good Prototype Defenses against Riflemen include Shock Blasters, Hot Pots, Microwav'rs and Flotsam Cannons. All of these are capable of defeating hordes of Riflemen quickly, but they can also prove to be prime targets for Shock Bombs.
Upgrade Differences
- There are no visual changes between levels, but each upgrade increases the Rifleman's hitpoints (by 7%), DPS (by 8%), and training cost.
Trivia
- They appear as the snipers in Sniper Towers. However, their rate of fire is different.
- During the tutorial, the training time of 5 Riflemen is reduced to 5 seconds, and costs 0 Diamonds to complete.
Statistics
| Unit Size |
Training Time |
Movement Speed |
Attack Range |
Attack Speed |
Headquarters Level Required |
|---|---|---|---|---|---|
| 1 | 1m | Moderate / 220 | Medium / 4.7 Tiles | 1s | 1 |
| Level |
Hitpoints |
DPS |
Training Cost |
Research Cost |
Armory |
Research Time |
Instant |
XP Gain |
|---|---|---|---|---|---|---|---|---|
| 1 | 140 | 30 | 20 | N/A | N/A | N/A | N/A | N/A |
| 2 | 150 | 32 | 50 | 9,500 | 1 | 2h | 56 | 14 |
| 3 | 160 | 35 | 100 | 19,500 | 2 | 3h | 79 | 17 |
| 4 | 172 | 38 | 150 | 42,000 | 3 | 6h | 138 | 24 |
| 5 | 184 | 41 | 200 | 83,000 | 4 | 8h | 190 | 30 |
| 6 | 196 | 44 | 250 | 140,000 | 5 | 12h | 261 | 37 |
| 7 | 210 | 48 | 300 | 236,000 | 6 | 17h | 349 | 43 |
| 8 | 225 | 52 | 350 | 370,000 | 7 | 22h | 444 | 50 |
| 9 | 241 | 56 | 400 | 540,000 | 8 | 1d | 517 | 52 |
| 10 | 257 | 61 | 450 | 630,000 | 9 | 1d 1h | 552 | 52 |
| 11 | 275 | 66 | 500 | 710,000 | 10 | 1d 4h | 602 | 55 |
| 12 | 295 | 71 | 600 | 970,000 | 11 | 1d 9h | 716 | 61 |
| 13 | 315 | 77 | 700 | 1,320,000 | 12 | 1d 12h | 832 | 67 |
| 14 | 337 | 84 | 800 | 1,500,000 | 13 | 1d 15h | 901 | 67 |
| 15 | 361 | 90 | 900 | 1,800,000 | 14 | 2d | 1,038 | 74 |
| 16 | 386 | 98 | 1,000 | 2,480,000 | 15 | 2d 3h | 1,211 | 78 |
| 17 | 413 | 106 | 1,100 | 2,850,000 | 16 | 2d 5h | 1,304 | 78 |
| 18 | 442 | 115 | 1,200 | 3,200,000 | 17 | 2d 11h | 1,417 | 83 |
| 19 | 473 | 124 | 1,300 | 3,800,000 | 18 | 2d 13h | 1,549 | 84 |
| 20 | 506 | 134 | 1,400 | 4,400,000 | 19 | 2d 17h | 1,690 | 87 |
| 21 | 542 | 145 | 1,500 | 5,100,000 | 20 | 2d 19h | 1,832 | 89 |
| 22 | 580 | 157 | 1,600 | 5,500,000 | 21 | 2d 21h | 1,916 | 91 |