(Blog post created or updated.) Tag: rte-source |
(Blog post created or updated.) |
||
| Line 1: | Line 1: | ||
| − | + | {{MagicWords}} |
|
Hello {{Template:USERNAME}}, this is my strategy guide about attacking for beginners. It intends to cover attacking from the beginning up to HQ7. |
Hello {{Template:USERNAME}}, this is my strategy guide about attacking for beginners. It intends to cover attacking from the beginning up to HQ7. |
||
Latest revision as of 01:32, 28 September 2020
Hello Commander, this is my strategy guide about attacking for beginners. It intends to cover attacking from the beginning up to HQ7.
Introduction
Attacking is an essential thing in Boom Beach. Without it, one would find it hard to play, more specifically play passively without hitting the "Attack" button at all. You'll need attacking in order to gain resources to upgrade your buildings and troops, as well as gain Victory Points that show your success in your fight against the Blackguard!
Keys to Attacking
Rule #1: Don't deal with defenses you can avoid
Take a look at an ongoing attack against a mercenary here. You can see that out of the two defenses on the base, I chose to only deal with one of them and ignore the other. Although the Sniper Tower on the west can deal damage, you have to remember it has a range. The Sniper Tower will only fire at troops that are within its range. Troops like mine that are outside its range will not be dealt with. If you can ignore some defenses this means you will not need to use too much Gunboat Energy to deal with them.
And that is why Flares come in handy.
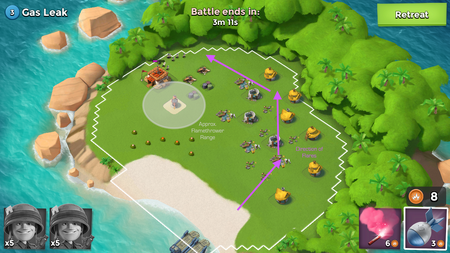
Look at an ongoing attack against Gas Leak here. I have already directed my Riflemen to the back of the HQ where the Flamethrower cannot fire. I used three Flares to guide the Riflemen to where they are standing in the picture and a fourth to get them in order so one cannot wander off and get killed. This way, the Riflemen can fire at the HQ without being attacked by the Flamethrower.
This is a concept that is important to learn and master because you will be using this fact to your advantage throughout the game.
Rule #2: Look for blind spots
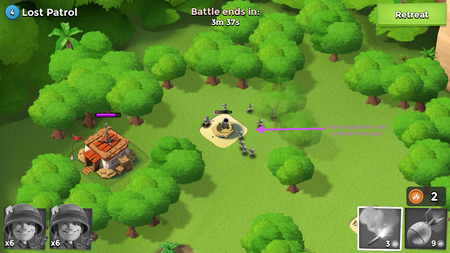
A Mortar. Yes, it is able to deal good damage to a few Riflemen at a time, but note that it has its own blind spot, though small, is still something you can use to your advantage. Here in the example I used a Flare and threw it right next to the Mortar's blind spot. As you can see, the result is Riflemen firing on the Mortar from all sides with no resistance whatsoever.
Be careful though, if you actually hit the Mortar with your Flare the Riflemen will merely only target the Mortar and not walk next to it. If you see a crosshair after you threw your Flare you know you've failed with this one. It might take some practice but once you've perfected it this technique can be used to take out any lone Mortar, Rocket Launcher or Shock Launcher you may come across in the future.
Attacking from the Back
Riflemen, Heavies and Zookas - Comparing and Contrasting
Up to HQ level 7, you will have three troops unlocked:
These three troops can form various combinations which will be explained here.
Individual Troops
Riflemen
Riflemen are specialists in overwhelming single target defenses such as the Sniper Tower, Cannon and Boom Cannon. They take up only one space in a Landing Craft and thus can completely fill up any Landing Craft.
They have rather low health compared to troops such as Heavies, and thus are not very resistant to defenses in general. While Cannons and Boom Cannons will cut through one of them clean, just be glad it's only one of them. Area-of-effect defenses like the Mortar can damage or destroy a few Riflemen at a time. And at lower levels, a "few" could be up to half an army, which is devastating.
Recommended to use them against: Sniper Towers, Cannons, Boom Cannons
Not recommended to use them against: Mortars, Machine Guns, Flamethrowers, Rocket Launchers (rarely encountered on Player Bases at lower levels), Shock Launchers (rarely encountered at lower levels)
Heavies
Heavies are early-game meat-shields and they specialize in serving this purpose. Until Tanks are unlocked, they are your only decent meat shield, and can take quite a few hits from defenses with low DPS such as Mortars and Machine Guns. They take up four spaces on a Landing Craft and thus you can only fit up to two or three of them on lower-leveled Landing Crafts.
Although they have high health, this is balanced by the fact that the Heavy deals very low DPS, even less than that of a Rifleman. It is hence not recommended to bring all-Heavies as an attack because of its low firepower, despite its high survivability. High-damage defenses such as the Cannon or Boom Cannon will take out a good chunk of health from the Heavy, and can even destroy him entirely. High-level Sniper Towers found in certain Blackguard Bases can also be considered a threat at lower levels.
Recommended to use them against: Machine Guns, Mortars, Shock Launchers (rarely encountered at lower levels)
Not recommended to use them against: Cannons, Boom Cannons, high-leveled Sniper Towers (rarely encountered at lower levels, and not a real threat to mid-high level Heavies)
Zookas
Zookas specialise in doing damage and can quickly destroy buildings. They also have a long range which can be used to keep them away from dangerous defenses like the Flamethrower, which they can outrange completely. They take up two spaces on a Landing Craft and can, in very large numbers, be used to overwhelm defenses like Cannons alongside Riflemen.
Their high damage is balanced by their fragility; they cannot survive a hit from most defenses, and even Mines will pose a threat of eliminating an entire group of them. Area-of-effect defenses will be even more devastating on them than on Riflemen; they will wear through the Zookas much more quickly.
Recommended to use them against: Cannons, Boom Cannons, Flamethrowers (outranges them)
Not recommended to use them against: Mortars, Machine Guns (especially high-level ones, without a meat shield to protect them), Rocket Launchers, Shock Launchers (at lower levels, a level 1 SL can easily eliminate a whole group of Zookas that are unprotected by Heavies)


